Docker Networking: The Most Misunderstood Part of Container Infrastructure
You can learn Docker basics in an afternoon — pull an image, run a container, expose a port. But when you start building real applications with multiple services, networking becomes the critical skill that separates casual Docker users from production-ready engineers.
Docker networking controls how containers communicate with each other, with the host system, and with the outside world. Get it wrong, and you will face mysterious connection timeouts, DNS resolution failures, and security vulnerabilities. Get it right, and you have a clean, isolated, and secure infrastructure.
This guide takes you from the default bridge network to production-grade overlay architectures, with real configurations you can use today.
Key Principle: In Docker, networking is not just plumbing — it is your primary security boundary. Network isolation between containers is as important as filesystem isolation. Every container should only be able to reach the services it absolutely needs.
Docker Network Types Explained
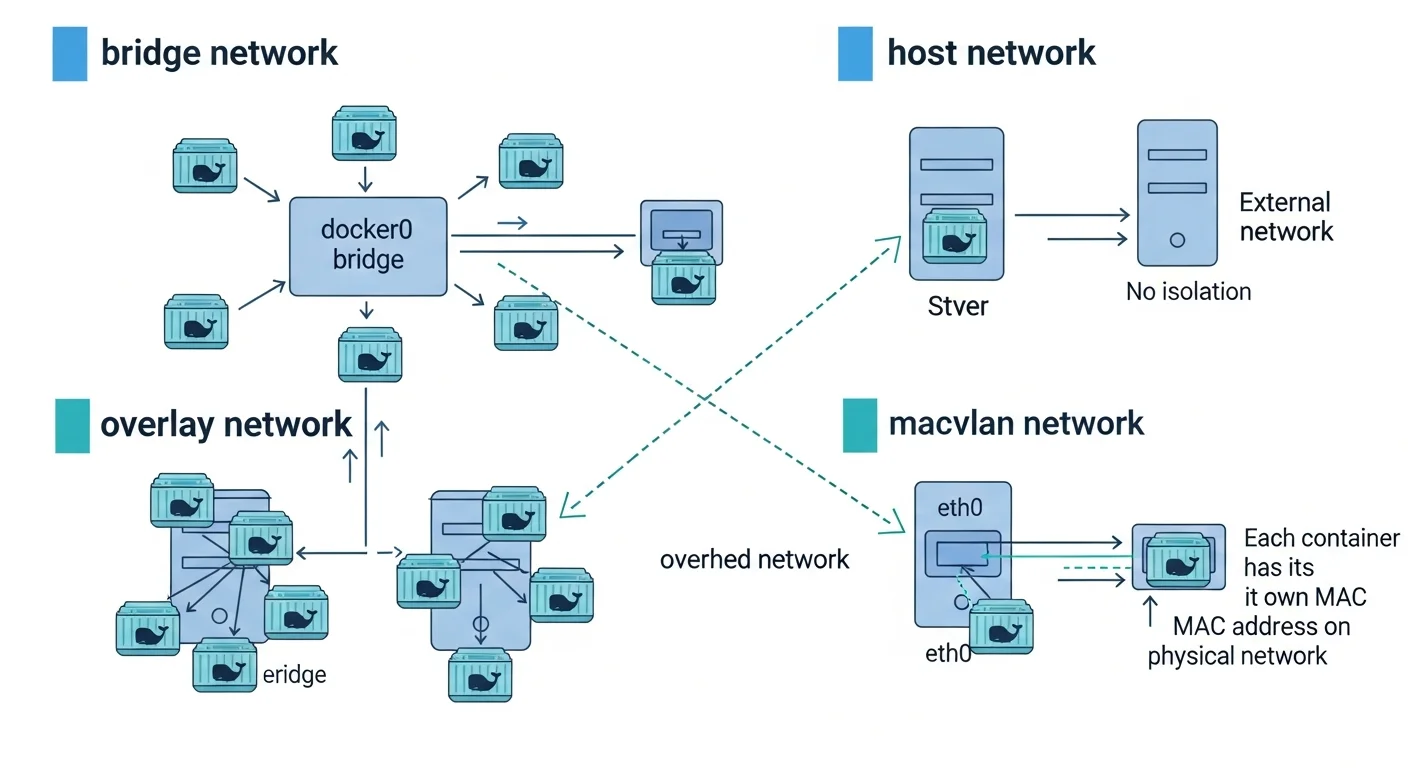
1. Bridge Network (Default)
When you install Docker, it creates a default bridge network called bridge (or docker0). Every container that starts without a specific network assignment connects to this bridge.
# See the default bridge network
docker network ls
# NETWORK ID     NAME      DRIVER    SCOPE
# a1b2c3d4e5f6   bridge    bridge    local
# f6e5d4c3b2a1   host      host      local
# 1a2b3c4d5e6f   none      null      local

# Inspect the bridge network
docker network inspect bridge
The Problem with the Default Bridge: Containers on the default bridge can communicate via IP addresses, but they cannot resolve each other by name. This is a deliberate design decision — the default bridge is legacy and has limited features.
The Solution — User-Defined Bridge Networks:
# Create a user-defined bridge network
docker network create --driver bridge app-network

# Run containers on the custom network
docker run -d --name api --network app-network node:20-alpine
docker run -d --name db --network app-network postgres:16

# Now containers CAN resolve each other by name!
# From the api container:
docker exec api ping db    # This works!
docker exec api nslookup db # DNS resolution works!| Feature | Default Bridge | User-Defined Bridge |
|---|---|---|
| DNS Resolution | No (IP only) | Yes (by container name) |
| Network Isolation | Shared with all default containers | Isolated per network |
| Connect/Disconnect Live | No | Yes |
| Environment Variable Sharing | Yes (legacy links) | No (use DNS instead) |
| Recommended for Production | No | Yes |
Source: Docker Documentation — Bridge Network Driver
2. Host Network
The host network mode removes network isolation between the container and the host. The container shares the host machine network stack directly. There is no NAT, no port mapping — the container binds directly to host ports.
# Run nginx directly on host network (binds to host port 80)
docker run -d --network host --name web nginx

# No -p flag needed — nginx listens directly on host:80
curl http://localhost:80
When to use host networking:
- Applications that need maximum network performance (no NAT overhead)
- Services that need to see the real client IP without proxy headers
- Monitoring tools that need access to all host network interfaces
- Legacy applications that bind to specific network interfaces
When NOT to use host networking:
- When you need network isolation (security)
- When multiple containers need the same port
- On Docker Desktop for Mac/Windows (host networking works differently)
3. Overlay Network (Multi-Host)
Overlay networks span multiple Docker hosts, allowing containers on different machines to communicate as if they were on the same local network. This is the foundation of Docker Swarm and multi-host container orchestration.
# Initialize Docker Swarm (required for overlay networks)
docker swarm init --advertise-addr 192.168.1.10

# Create an overlay network
docker network create --driver overlay --attachable app-overlay

# Create a service on the overlay network
docker service create --name api --network app-overlay --replicas 3 myapp:latest

# The 3 replicas can communicate by service name
# even if they run on different physical hosts
How overlay works under the hood: Docker uses VXLAN (Virtual Extensible LAN) to encapsulate container traffic inside UDP packets. Each packet gets a VXLAN header with a Network Identifier (VNI), allowing Docker to multiplex multiple overlay networks over the same physical infrastructure.
Source: Docker Documentation — Overlay Network Driver
4. Macvlan Network
Macvlan assigns a real MAC address to each container, making it appear as a physical device on your network. This is useful for applications that need to appear as physical hosts on the LAN.
# Create a macvlan network
docker network create -d macvlan \
    --subnet=192.168.1.0/24 \
    --gateway=192.168.1.1 \
    -o parent=eth0 \
    lan-network

# Run a container with a specific IP on the LAN
docker run -d --network lan-network --ip 192.168.1.100 \
    --name sensor-bridge sensor-app:latest

# This container is now directly accessible at 192.168.1.100
# from any device on the physical network
Use cases: IoT gateways, legacy applications requiring Layer 2 access, network monitoring tools, DHCP servers.
5. None Network
# Container with no network access at all
docker run -d --network none --name isolated secure-processor:latest

# This container cannot make any network connections
# Useful for pure computation tasks or security-sensitive processing
Docker DNS and Service Discovery
One of Docker most powerful networking features is its built-in DNS server. Every user-defined network gets automatic DNS resolution.
# docker-compose.yml
services:
  web:
    image: nginx
    networks:
      - frontend
      - backend
    depends_on:
      - api

  api:
    image: node:20-alpine
    networks:
      - backend
    environment:
      - DATABASE_URL=postgresql://user:pass@db:5432/myapp
      # "db" is resolved automatically by Docker DNS!

  db:
    image: postgres:16
    networks:
      - backend
    volumes:
      - pgdata:/var/lib/postgresql/data

networks:
  frontend:
    driver: bridge
  backend:
    driver: bridge
    internal: true  # No external access!

volumes:
  pgdata:
In this configuration:
- web can reach api by name (both on backend network)
- api can reach db by name (both on backend network)
- web CANNOT reach db directly (web is not on the backend network... wait, it is — but db is on an internal network with no external access)
- The backend network is
internal: true, meaning no container on it can reach the internet
Source: Docker Compose — Networking
DNS Round-Robin Load Balancing
# Scale a service to multiple containers
docker compose up -d --scale api=3

# Docker DNS returns all 3 IPs in round-robin
# Each request to "api" goes to a different container
docker exec web nslookup api
# Server:    127.0.0.11
# Name:      api
# Address 1: 172.18.0.3
# Address 2: 172.18.0.4
# Address 3: 172.18.0.5
Network Security Best Practices
Network Isolation Strategy
# Production-grade network architecture
docker network create frontend    # Exposed to internet (via reverse proxy)
docker network create backend     # Application services
docker network create --internal data  # Database layer (no internet access)

# Reverse proxy (Traefik/Nginx) connects to frontend + backend
# API services connect to backend + data
# Database connects to data only| Practice | Implementation | Why |
|---|---|---|
| Use user-defined networks | Never use the default bridge | Better DNS, isolation, control |
| Separate frontend/backend | Different networks for each tier | Limit blast radius of compromises |
| Use internal networks | internal: true for data tier | Prevent database internet access |
| Encrypt overlay traffic | --opt encrypted | Protect inter-host communication |
| Limit published ports | Bind to 127.0.0.1 when possible | Prevent external access |
| Use read-only containers | read_only: true | Prevent filesystem modifications |
| Drop capabilities | cap_drop: [ALL] | Minimize container privileges |
Binding Ports Securely
# BAD: Exposes port to all interfaces (0.0.0.0)
docker run -p 5432:5432 postgres

# GOOD: Bind to localhost only
docker run -p 127.0.0.1:5432:5432 postgres

# GOOD: Bind to specific interface
docker run -p 10.0.0.1:5432:5432 postgres
Source: OWASP — Docker Security Cheat Sheet
Debugging Docker Networking
# Inspect a network and see connected containers
docker network inspect app-network

# Check container IP address
docker inspect -f "{{range .NetworkSettings.Networks}}{{.IPAddress}}{{end}}" container_name

# Check container DNS resolution
docker exec container_name nslookup service_name

# Test connectivity between containers
docker exec container_name ping -c 3 other_container

# Check which ports are listening inside a container
docker exec container_name ss -tlnp

# Use nicolaka/netshoot for advanced debugging
docker run -it --network app-network nicolaka/netshoot
# Now you have tcpdump, dig, nmap, iftop, etc.

# Capture traffic on a Docker network
docker run --net=host -v /tmp:/capture nicolaka/netshoot \
    tcpdump -i docker0 -w /capture/traffic.pcap
Docker Networking Quick Reference
| Network Driver | Scope | DNS | Multi-Host | Best For |
|---|---|---|---|---|
| bridge | Single host | Yes (user-defined) | No | Most applications |
| host | Single host | Host DNS | No | Maximum performance |
| overlay | Multi-host | Yes | Yes | Swarm/cluster services |
| macvlan | Single host | External | No | LAN integration, IoT |
| none | N/A | No | No | Isolated computation |