The multi-cloud era is no longer a future prediction — it is today's reality. According to Flexera's 2025 State of the Cloud report, 89% of enterprises have adopted a multi-cloud strategy. But managing infrastructure across AWS, Azure, and GCP manually is a recipe for configuration drift, security gaps, and spiraling costs.
The solution? Infrastructure as Code (IaC) with two complementary tools: Terraform for provisioning cloud resources and Ansible for configuring and managing what runs on them. Together, they form the most powerful automation stack in 2026.
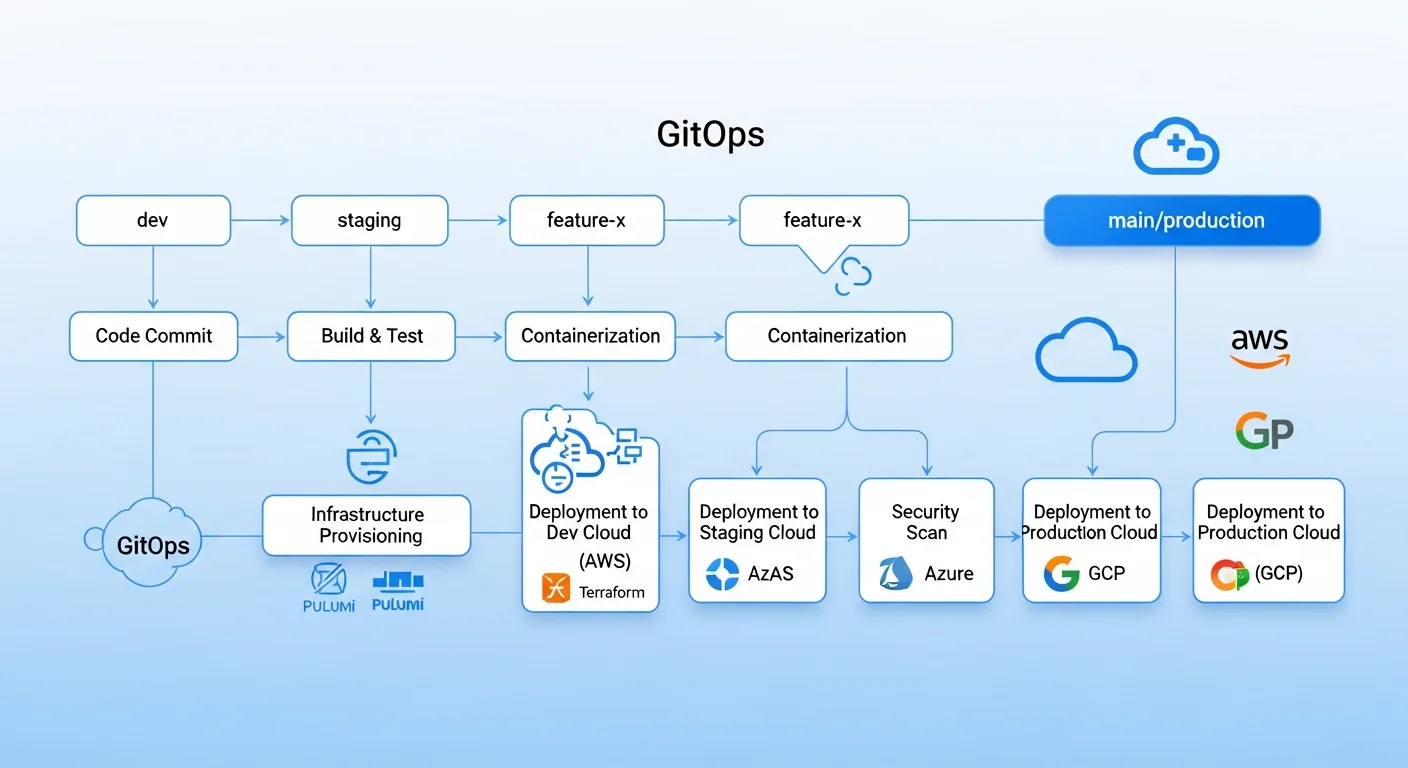
Architecture Overview: How Terraform and Ansible Work Together
Here is the workflow we will build in this guide:
- Terraform provisions the infrastructure: VPCs, subnets, security groups, VMs, managed databases, load balancers
- Terraform outputs the IP addresses and connection details of the created resources
- Ansible uses those outputs to configure the servers: install packages, deploy applications, set up monitoring
- CI/CD pipeline orchestrates both tools automatically on every git push
Part 1: Terraform for Multi-Cloud Provisioning
1.1 Project Structure
A well-organized Terraform project is crucial for maintainability. Here is the structure we recommend for multi-cloud deployments:
infrastructure/
  modules/
    networking/        # Reusable VPC/subnet module
      main.tf
      variables.tf
      outputs.tf
    compute/           # Reusable VM/instance module
      main.tf
      variables.tf
      outputs.tf
    database/          # Managed database module
      main.tf
      variables.tf
      outputs.tf
  environments/
    staging/
      main.tf
      variables.tf
      terraform.tfvars
      backend.tf
    production/
      main.tf
      variables.tf
      terraform.tfvars
      backend.tf
  ansible/
    inventory/
      hosts.yml        # Dynamic inventory from Terraform
    playbooks/
      common.yml       # Base configuration
      webserver.yml    # Web server setup
      monitoring.yml   # Monitoring stack
    roles/
      base/
      nginx/
      postgresql/
      monitoring/
1.2 Remote State Management
Terraform state is the backbone of your infrastructure. In a team environment, it must be stored remotely with locking to prevent concurrent modifications:
# backend.tf — AWS S3 backend with DynamoDB locking
terraform {
  backend "s3" {
    bucket         = "mycompany-terraform-state"
    key            = "production/infrastructure.tfstate"
    region         = "eu-west-1"
    encrypt        = true
    dynamodb_table = "terraform-state-lock"
    kms_key_id     = "alias/terraform-state-key"
  }

  required_providers {
    aws = {
      source  = "hashicorp/aws"
      version = "~> 5.0"
    }
    azurerm = {
      source  = "hashicorp/azurerm"
      version = "~> 3.0"
    }
  }
}
1.3 Reusable Networking Module
Create a cloud-agnostic networking module that works across providers:
# modules/networking/variables.tf
variable "project_name" {
  description = "Project identifier for resource naming"
  type        = string
}

variable "environment" {
  description = "Environment: staging or production"
  type        = string
  validation {
    condition     = contains(["staging", "production"], var.environment)
    error_message = "Environment must be staging or production."
  }
}

variable "vpc_cidr" {
  description = "CIDR block for the VPC"
  type        = string
  default     = "10.0.0.0/16"
}

variable "availability_zones" {
  description = "List of availability zones"
  type        = list(string)
}

# modules/networking/main.tf
resource "aws_vpc" "main" {
  cidr_block           = var.vpc_cidr
  enable_dns_hostnames = true
  enable_dns_support   = true

  tags = {
    Name        = "${var.project_name}-${var.environment}-vpc"
    Environment = var.environment
    ManagedBy   = "terraform"
  }
}

resource "aws_subnet" "public" {
  count             = length(var.availability_zones)
  vpc_id            = aws_vpc.main.id
  cidr_block        = cidrsubnet(var.vpc_cidr, 8, count.index)
  availability_zone = var.availability_zones[count.index]

  map_public_ip_on_launch = true

  tags = {
    Name        = "${var.project_name}-public-${count.index}"
    Environment = var.environment
    Tier        = "public"
  }
}

resource "aws_subnet" "private" {
  count             = length(var.availability_zones)
  vpc_id            = aws_vpc.main.id
  cidr_block        = cidrsubnet(var.vpc_cidr, 8, count.index + 100)
  availability_zone = var.availability_zones[count.index]

  tags = {
    Name        = "${var.project_name}-private-${count.index}"
    Environment = var.environment
    Tier        = "private"
  }
}

# Internet Gateway for public subnets
resource "aws_internet_gateway" "main" {
  vpc_id = aws_vpc.main.id
  tags = { Name = "${var.project_name}-igw" }
}

# NAT Gateway for private subnets
resource "aws_eip" "nat" {
  domain = "vpc"
}

resource "aws_nat_gateway" "main" {
  allocation_id = aws_eip.nat.id
  subnet_id     = aws_subnet.public[0].id
  tags = { Name = "${var.project_name}-nat" }
}

# modules/networking/outputs.tf
output "vpc_id" {
  value = aws_vpc.main.id
}

output "public_subnet_ids" {
  value = aws_subnet.public[*].id
}

output "private_subnet_ids" {
  value = aws_subnet.private[*].id
}
1.4 Compute Module with Security Hardening
# modules/compute/main.tf
resource "aws_instance" "server" {
  count                  = var.instance_count
  ami                    = var.ami_id
  instance_type          = var.instance_type
  subnet_id              = var.subnet_ids[count.index % length(var.subnet_ids)]
  key_name               = var.ssh_key_name
  vpc_security_group_ids = [aws_security_group.server.id]

  root_block_device {
    volume_size = var.root_volume_size
    volume_type = "gp3"
    encrypted   = true  # Always encrypt at rest
  }

  metadata_options {
    http_tokens   = "required"  # Enforce IMDSv2
    http_endpoint = "enabled"
  }

  tags = {
    Name        = "${var.project_name}-${var.role}-${count.index}"
    Environment = var.environment
    Role        = var.role
    ManagedBy   = "terraform"
  }
}

resource "aws_security_group" "server" {
  name_prefix = "${var.project_name}-${var.role}-"
  vpc_id      = var.vpc_id

  # SSH only from bastion/VPN
  ingress {
    from_port       = 22
    to_port         = 22
    protocol        = "tcp"
    security_groups = [var.bastion_sg_id]
    description     = "SSH from bastion only"
  }

  # Application port
  dynamic "ingress" {
    for_each = var.app_ports
    content {
      from_port       = ingress.value
      to_port         = ingress.value
      protocol        = "tcp"
      security_groups = [var.lb_sg_id]
      description     = "App traffic from load balancer"
    }
  }

  egress {
    from_port   = 0
    to_port     = 0
    protocol    = "-1"
    cidr_blocks = ["0.0.0.0/0"]
  }

  lifecycle {
    create_before_destroy = true
  }
}

# Generate Ansible inventory dynamically
resource "local_file" "ansible_inventory" {
  content = yamlencode({
    all = {
      hosts = {
        for idx, instance in aws_instance.server :
        instance.tags.Name => {
          ansible_host = instance.private_ip
          ansible_user = "ec2-user"
          role         = var.role
        }
      }
    }
  })
  filename = "${path.module}/../../ansible/inventory/hosts.yml"
}
Part 2: Ansible for Server Configuration
2.1 Dynamic Inventory from Terraform
Instead of maintaining a static inventory file, let Terraform generate it automatically. When your infrastructure changes, your inventory updates with it:
# ansible/inventory/terraform_inventory.py
#!/usr/bin/env python3
"""Dynamic Ansible inventory from Terraform state"""
import json
import subprocess
import sys

def get_terraform_output():
    result = subprocess.run(
        ["terraform", "output", "-json"],
        capture_output=True, text=True,
        cwd="../../infrastructure/environments/production"
    )
    return json.loads(result.stdout)

def main():
    outputs = get_terraform_output()
    inventory = {
        "webservers": {
            "hosts": outputs["web_ips"]["value"],
            "vars": {
                "ansible_user": "ec2-user",
                "ansible_ssh_private_key_file": "~/.ssh/deploy_key"
            }
        },
        "databases": {
            "hosts": outputs["db_ips"]["value"],
            "vars": {
                "ansible_user": "ec2-user"
            }
        },
        "_meta": {
            "hostvars": {}
        }
    }
    print(json.dumps(inventory, indent=2))

if __name__ == "__main__":
    main()
2.2 Base Server Configuration Role
Create a base role that applies to every server, regardless of its purpose:
# ansible/roles/base/tasks/main.yml
---
- name: Update all packages
  ansible.builtin.dnf:
    name: "*"
    state: latest
    security: yes
  when: ansible_os_family == "RedHat"

- name: Install essential packages
  ansible.builtin.dnf:
    name:
      - vim
      - htop
      - tmux
      - curl
      - wget
      - git
      - jq
      - unzip
      - fail2ban
      - chrony
    state: present

- name: Configure NTP with chrony
  ansible.builtin.template:
    src: chrony.conf.j2
    dest: /etc/chrony.conf
    owner: root
    group: root
    mode: "0644"
  notify: restart chrony

- name: Harden SSH configuration
  ansible.builtin.template:
    src: sshd_config.j2
    dest: /etc/ssh/sshd_config.d/hardened.conf
    owner: root
    group: root
    mode: "0600"
    validate: "sshd -t -f %s"
  notify: restart sshd

- name: Configure fail2ban for SSH
  ansible.builtin.template:
    src: jail.local.j2
    dest: /etc/fail2ban/jail.local
    owner: root
    group: root
    mode: "0644"
  notify: restart fail2ban

- name: Apply kernel hardening parameters
  ansible.posix.sysctl:
    name: "{{ item.key }}"
    value: "{{ item.value }}"
    sysctl_set: yes
    state: present
    reload: yes
  loop:
    - { key: "net.ipv4.tcp_syncookies", value: "1" }
    - { key: "net.ipv4.conf.all.rp_filter", value: "1" }
    - { key: "net.ipv4.conf.all.accept_redirects", value: "0" }
    - { key: "kernel.randomize_va_space", value: "2" }
    - { key: "fs.suid_dumpable", value: "0" }

- name: Configure automatic security updates
  ansible.builtin.dnf:
    name: dnf-automatic
    state: present

- name: Enable automatic security updates
  ansible.builtin.template:
    src: automatic.conf.j2
    dest: /etc/dnf/automatic.conf
  notify: enable dnf-automatic

- name: Set timezone to UTC
  community.general.timezone:
    name: UTC
2.3 Web Server Role with NGINX
# ansible/roles/nginx/tasks/main.yml
---
- name: Install NGINX
  ansible.builtin.dnf:
    name: nginx
    state: present

- name: Deploy NGINX configuration
  ansible.builtin.template:
    src: nginx.conf.j2
    dest: /etc/nginx/nginx.conf
    owner: root
    group: root
    mode: "0644"
    validate: "nginx -t -c %s"
  notify: reload nginx

- name: Deploy virtual host configuration
  ansible.builtin.template:
    src: vhost.conf.j2
    dest: "/etc/nginx/conf.d/{{ app_domain }}.conf"
    owner: root
    group: root
    mode: "0644"
  notify: reload nginx

- name: Configure SSL with Let's Encrypt
  ansible.builtin.include_role:
    name: geerlingguy.certbot
  vars:
    certbot_admin_email: "{{ admin_email }}"
    certbot_create_if_missing: yes
    certbot_certs:
      - domains:
          - "{{ app_domain }}"

- name: Set up log rotation
  ansible.builtin.template:
    src: nginx-logrotate.j2
    dest: /etc/logrotate.d/nginx
    owner: root
    group: root
    mode: "0644"

- name: Enable and start NGINX
  ansible.builtin.systemd:
    name: nginx
    enabled: yes
    state: started
2.4 Monitoring Role with Prometheus Node Exporter
# ansible/roles/monitoring/tasks/main.yml
---
- name: Create prometheus user
  ansible.builtin.user:
    name: prometheus
    system: yes
    shell: /usr/sbin/nologin
    create_home: no

- name: Download Node Exporter
  ansible.builtin.get_url:
    url: "https://github.com/prometheus/node_exporter/releases/download/v{{ node_exporter_version }}/node_exporter-{{ node_exporter_version }}.linux-amd64.tar.gz"
    dest: /tmp/node_exporter.tar.gz
    checksum: "sha256:{{ node_exporter_checksum }}"

- name: Extract and install Node Exporter
  ansible.builtin.unarchive:
    src: /tmp/node_exporter.tar.gz
    dest: /usr/local/bin/
    remote_src: yes
    extra_opts: ["--strip-components=1"]
    creates: /usr/local/bin/node_exporter

- name: Deploy Node Exporter systemd unit
  ansible.builtin.template:
    src: node_exporter.service.j2
    dest: /etc/systemd/system/node_exporter.service
  notify:
    - daemon reload
    - restart node_exporter

- name: Enable and start Node Exporter
  ansible.builtin.systemd:
    name: node_exporter
    enabled: yes
    state: started
Part 3: Multi-Cloud Strategy
3.1 Why Multi-Cloud?
Going multi-cloud is not about using every provider for everything. It is about leveraging each provider's strengths:
| Provider | Strength | Best For |
|---|---|---|
| AWS | Broadest service catalog, largest market share | Primary workloads, managed services |
| Azure | Enterprise integration, Active Directory | Windows workloads, hybrid cloud |
| GCP | Data analytics, ML/AI, Kubernetes (GKE) | Data pipelines, machine learning |
3.2 Cross-Cloud Terraform Configuration
# environments/production/main.tf
# Primary infrastructure on AWS
module "aws_network" {
  source             = "../../modules/networking"
  project_name       = var.project_name
  environment        = "production"
  vpc_cidr           = "10.0.0.0/16"
  availability_zones = ["eu-west-1a", "eu-west-1b", "eu-west-1c"]
}

module "aws_webservers" {
  source         = "../../modules/compute"
  project_name   = var.project_name
  environment    = "production"
  role           = "webserver"
  instance_count = 3
  instance_type  = "t3.medium"
  subnet_ids     = module.aws_network.public_subnet_ids
  vpc_id         = module.aws_network.vpc_id
}

# Disaster recovery on Azure
module "azure_dr" {
  source = "../../modules/azure-dr"
  providers = {
    azurerm = azurerm.westeurope
  }
  project_name    = var.project_name
  environment     = "production-dr"
  resource_group  = "myapp-dr-rg"
  location        = "westeurope"
  replication_source = module.aws_webservers.instance_ids
}

# Data analytics on GCP
module "gcp_analytics" {
  source     = "../../modules/gcp-analytics"
  project_id = var.gcp_project_id
  region     = "europe-west1"
  dataset_id = "production_analytics"
}
Part 4: GitOps Workflow
The final piece is automating everything through a GitOps pipeline where infrastructure changes flow through pull requests:
# .github/workflows/infrastructure.yml
name: Infrastructure Pipeline
on:
  pull_request:
    paths: ["infrastructure/**"]
  push:
    branches: [main]
    paths: ["infrastructure/**"]

jobs:
  terraform-plan:
    runs-on: ubuntu-latest
    if: github.event_name == 'pull_request'
    steps:
      - uses: actions/checkout@v4

      - name: Terraform Init
        run: terraform init
        working-directory: infrastructure/environments/production

      - name: Terraform Plan
        run: terraform plan -out=tfplan -no-color
        working-directory: infrastructure/environments/production

      - name: Post plan to PR
        uses: actions/github-script@v7
        with:
          script: |
            const plan = require('fs').readFileSync('plan-output.txt', 'utf8');
            github.rest.issues.createComment({
              owner: context.repo.owner,
              repo: context.repo.repo,
              issue_number: context.issue.number,
              body: `## Terraform Plan\n\`\`\`\n${plan}\n\`\`\``
            });

  terraform-apply:
    runs-on: ubuntu-latest
    if: github.ref == 'refs/heads/main' && github.event_name == 'push'
    steps:
      - uses: actions/checkout@v4

      - name: Terraform Apply
        run: |
          terraform init
          terraform apply -auto-approve
        working-directory: infrastructure/environments/production

      - name: Run Ansible Configuration
        run: |
          ansible-playbook -i inventory/hosts.yml \
            playbooks/site.yml \
            --diff --check  # Dry run first
          ansible-playbook -i inventory/hosts.yml \
            playbooks/site.yml
        working-directory: infrastructure/ansible
Cost Optimization Strategies
Multi-cloud can get expensive. Here are proven strategies to keep costs under control:
- Use Terraform's lifecycle policies to prevent accidental resource recreation
- Tag everything — use consistent tags for cost allocation and orphan resource detection
- Right-size instances — start small and scale up based on monitoring data
- Use spot/preemptible instances for non-critical workloads (up to 90% savings)
- Implement auto-scaling to match resource usage to actual demand
- Schedule non-production environments — shut down staging at night (saves 60%)
- Use reserved instances for predictable, long-running workloads (30-70% savings)
- Monitor with Infracost — get cost estimates in your Terraform PR reviews
# Use Infracost in your CI/CD pipeline
# .github/workflows/cost-check.yml
- name: Run Infracost
  run: |
    infracost breakdown --path infrastructure/environments/production \
      --format json --out-file infracost.json

    infracost comment github \
      --path infracost.json \
      --repo ${{ github.repository }} \
      --pull-request ${{ github.event.pull_request.number }} \
      --github-token ${{ secrets.GITHUB_TOKEN }}
Frequently Asked Questions
Should I learn Terraform or Ansible first?
Start with Ansible. It has a gentler learning curve (YAML-based, agentless, SSH-based) and gives you immediate value by automating server configuration tasks you are already doing manually. Once comfortable, add Terraform to handle cloud resource provisioning. Together, they cover the full infrastructure lifecycle.
Can Terraform replace Ansible entirely?
Not effectively. Terraform can run provisioning scripts via user_data or remote-exec, but it lacks Ansible's powerful configuration management capabilities: idempotent module system, role-based organization, dynamic inventory, and thousands of community modules. Use each tool for what it does best.
How do I handle Terraform state conflicts in a team?
Use remote state backends with locking (S3 + DynamoDB for AWS, Azure Blob Storage + Table Storage for Azure). Never run terraform apply locally in production — always go through your CI/CD pipeline. Use terraform workspaces or separate state files per environment to minimize blast radius.
Is multi-cloud actually worth the complexity?
It depends on your scale and requirements. For most small-to-medium teams, a single cloud provider with multi-region deployments provides sufficient redundancy. Multi-cloud makes sense when you need: vendor negotiation leverage, compliance with data residency laws, or specific services only available on certain providers. Do not go multi-cloud just because it sounds impressive.
What about Pulumi or CDK as alternatives?
Pulumi and AWS CDK use general-purpose programming languages instead of HCL/YAML, which appeals to developers. However, Terraform remains the industry standard with the largest ecosystem. If your team is already proficient in Python or TypeScript and struggles with HCL, Pulumi is worth considering. For most infrastructure teams, Terraform's maturity and community support make it the safer choice in 2026.
Recommended Resources
Build your infrastructure automation expertise with these in-depth guides:
- Ansible Automation: From Zero to Production — Complete Ansible mastery from basics to advanced patterns
- AWS for Linux Administrators — Navigate AWS services from a Linux sysadmin perspective
- Cloud Computing Basics — Foundational cloud concepts before diving into multi-cloud
- Kubernetes Fundamentals — Essential when deploying K8s clusters with Terraform
- Linux System Administration Masterclass — The Linux skills underpinning all cloud infrastructure