The traditional perimeter-based security model is dead. In 2026, with remote workforces, cloud-native applications, and increasingly sophisticated threat actors, the question is no longer whether to adopt Zero Trust — it is how quickly you can implement it. This guide walks you through building a complete Zero Trust security architecture on Linux servers, from identity verification to micro-segmentation and continuous monitoring.
What Is Zero Trust and Why Does It Matter in 2026?
Zero Trust is a security framework built on one fundamental principle: never trust, always verify. Unlike traditional security models that assume everything inside the network perimeter is safe, Zero Trust treats every user, device, and network flow as potentially hostile — regardless of location.
According to the 2025 IBM Cost of a Data Breach Report, organizations with mature Zero Trust implementations experienced breach costs 42% lower than those without. With the average breach now costing $4.88 million, the ROI of Zero Trust is undeniable.
The Five Pillars of Zero Trust
- Identity Verification — Every access request must be authenticated and authorized
- Device Validation — Only compliant, managed devices gain access
- Network Segmentation — Micro-perimeters around every resource
- Application Security — Least-privilege access to applications and data
- Continuous Monitoring — Real-time analytics and automated response
Step 1: Hardening the Linux Foundation
Before implementing any Zero Trust controls, your Linux servers must be properly hardened. Think of this as building the foundation of a house — everything else depends on it being solid.
1.1 Minimal Installation and Attack Surface Reduction
Start with a minimal server installation. Every unnecessary package is a potential attack vector. On AlmaLinux, Rocky Linux, or RHEL-based systems:
# List all installed packages
rpm -qa | wc -l

# Remove unnecessary services
sudo dnf remove -y cups avahi telnet-server rsh-server

# Disable unused services
sudo systemctl disable --now bluetooth.service
sudo systemctl disable --now cups.service
sudo systemctl disable --now avahi-daemon.service

# Verify only essential services are running
sudo systemctl list-units --type=service --state=running
1.2 Kernel Hardening with sysctl
The Linux kernel offers dozens of security-relevant parameters. Here are the critical ones for a Zero Trust environment:
# /etc/sysctl.d/99-zero-trust.conf

# Disable IP forwarding (unless this is a router)
net.ipv4.ip_forward = 0
net.ipv6.conf.all.forwarding = 0

# Prevent source routing attacks
net.ipv4.conf.all.accept_source_route = 0
net.ipv6.conf.all.accept_source_route = 0

# Enable reverse path filtering (anti-spoofing)
net.ipv4.conf.all.rp_filter = 1
net.ipv4.conf.default.rp_filter = 1

# Ignore ICMP redirects (prevent MITM)
net.ipv4.conf.all.accept_redirects = 0
net.ipv6.conf.all.accept_redirects = 0

# Log suspicious packets
net.ipv4.conf.all.log_martians = 1

# Harden TCP SYN cookies (anti-SYN flood)
net.ipv4.tcp_syncookies = 1

# Restrict kernel pointer exposure
kernel.kptr_restrict = 2

# Restrict dmesg access
kernel.dmesg_restrict = 1

# Enable ASLR
kernel.randomize_va_space = 2
Apply the settings immediately:
sudo sysctl --system1.3 Mandatory Access Control with SELinux
SELinux is your first line of defense in a Zero Trust model. It enforces mandatory access controls that even root cannot override:
# Ensure SELinux is in enforcing mode
sudo setenforce 1
sudo sed -i 's/SELINUX=.*/SELINUX=enforcing/' /etc/selinux/config

# Check current status
sestatus

# Audit SELinux denials
sudo ausearch -m avc -ts recent
Step 2: Identity-Based Access Control
In a Zero Trust architecture, identity is the new perimeter. Every access request must be tied to a verified identity — no anonymous connections, no shared credentials, no implicit trust.
2.1 SSH Hardening for Zero Trust
SSH is the primary access vector for Linux servers. Lock it down completely:
# /etc/ssh/sshd_config.d/zero-trust.conf

# Disable password authentication entirely
PasswordAuthentication no
ChallengeResponseAuthentication no

# Only allow specific users/groups
AllowGroups sre-team db-admins

# Use Ed25519 keys only (strongest algorithm)
PubkeyAcceptedAlgorithms ssh-ed25519

# Limit authentication attempts
MaxAuthTries 3
MaxSessions 2
LoginGraceTime 30

# Disable root login
PermitRootLogin no

# Enable strict mode
StrictModes yes

# Use only Protocol 2
Protocol 2

# Disconnect idle sessions after 5 minutes
ClientAliveInterval 300
ClientAliveCountMax 0

# Log everything
LogLevel VERBOSE
2.2 Certificate-Based SSH Authentication
For true Zero Trust SSH, move beyond static public keys to short-lived SSH certificates. This eliminates the problem of key sprawl and ensures every session is freshly authenticated:
# Generate a Certificate Authority key pair
ssh-keygen -t ed25519 -f /etc/ssh/ca_key -C "SSH CA Key"

# Sign a user key with a 12-hour validity
ssh-keygen -s /etc/ssh/ca_key \
    -I "user-john-doe" \
    -n john.doe \
    -V +12h \
    ~/.ssh/id_ed25519.pub

# Configure the server to trust the CA
echo "TrustedUserCAKeys /etc/ssh/ca_key.pub" >> /etc/ssh/sshd_config
sudo systemctl restart sshd
Short-lived certificates are a game-changer: even if compromised, they expire within hours. Tools like HashiCorp Vault or Teleport can automate this workflow at scale.
2.3 Multi-Factor Authentication (MFA)
Layer MFA on top of certificate-based authentication for critical systems:
# Install Google Authenticator PAM module
sudo dnf install -y google-authenticator

# Configure PAM for SSH
# Add to /etc/pam.d/sshd:
auth required pam_google_authenticator.so nullok

# Enable in sshd_config:
AuthenticationMethods publickey,keyboard-interactive
Step 3: Network Micro-Segmentation
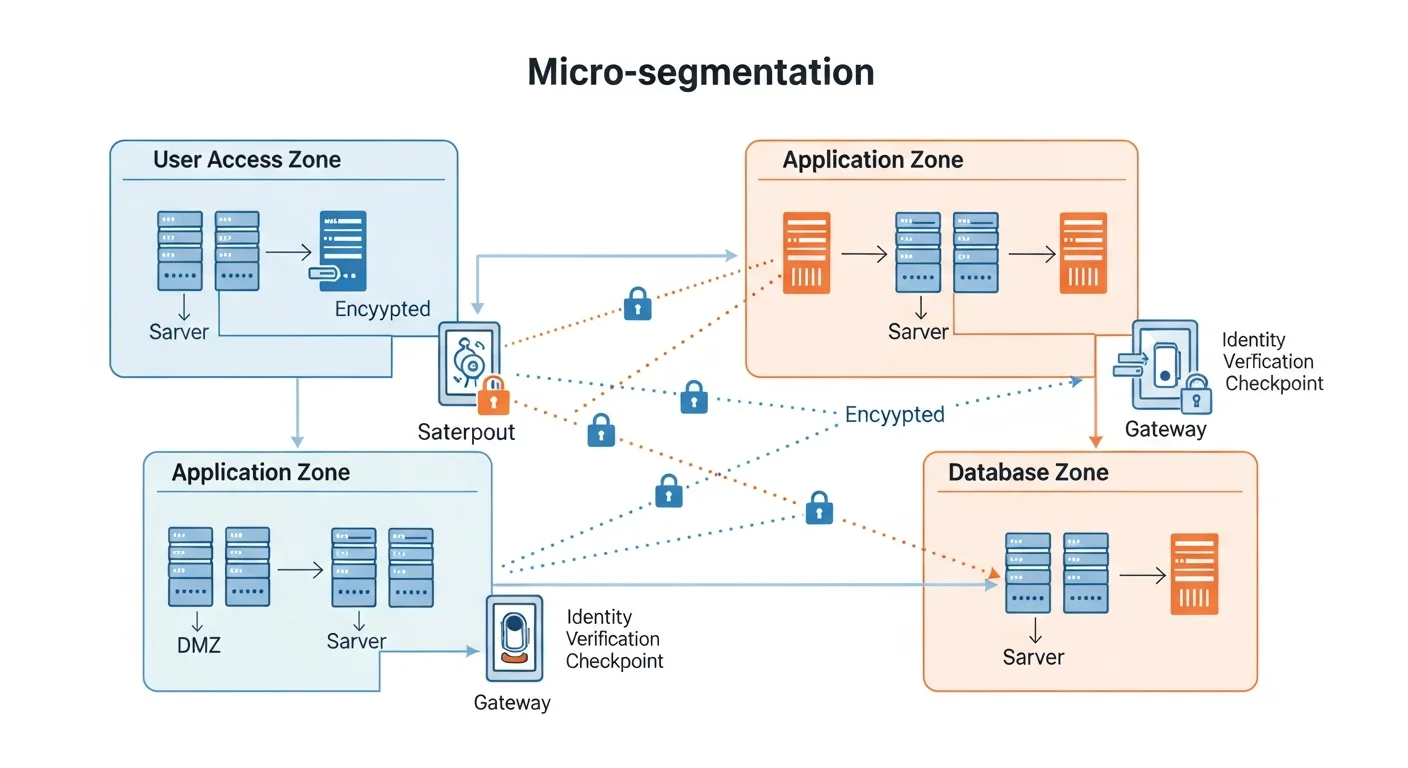
Micro-segmentation is the backbone of Zero Trust networking. Instead of one flat network where everything can talk to everything, you create isolated segments where communication is explicitly permitted only when necessary.
3.1 nftables Zones Architecture
Design your network into security zones using nftables (the modern replacement for iptables):
#!/usr/bin/nft -f
# /etc/nftables.d/zero-trust-zones.nft

table inet zero_trust {
    # Define zone chains
    chain web_zone {
        # Web servers can only receive HTTP/S
        tcp dport { 80, 443 } accept
        drop
    }

    chain app_zone {
        # App servers accept only from web zone
        ip saddr 10.10.1.0/24 tcp dport { 8080, 8443 } accept
        drop
    }

    chain db_zone {
        # Database accepts only from app zone
        ip saddr 10.10.2.0/24 tcp dport 5432 accept
        drop
    }

    chain monitoring_zone {
        # Monitoring can reach all zones (read-only)
        tcp dport { 9090, 9100 } accept
        drop
    }

    chain forward {
        type filter hook forward priority 0; policy drop;

        # Established connections
        ct state established,related accept

        # Zone-to-zone rules
        iifname "eth0.10" jump web_zone
        iifname "eth0.20" jump app_zone
        iifname "eth0.30" jump db_zone
        iifname "eth0.40" jump monitoring_zone

        # Default deny everything else
        log prefix "ZT-DENIED: " drop
    }
}
3.2 Service Mesh with mTLS
For service-to-service communication, implement mutual TLS (mTLS) so that both sides of every connection verify each other's identity:
# Generate a root CA for internal services
openssl req -x509 -newkey ec -pkeyopt ec_paramgen_curve:P-256 \
    -days 365 -nodes -keyout ca-key.pem -out ca-cert.pem \
    -subj "/CN=Internal Zero Trust CA"

# Generate a server certificate
openssl req -newkey ec -pkeyopt ec_paramgen_curve:P-256 \
    -nodes -keyout server-key.pem -out server-csr.pem \
    -subj "/CN=api-server.internal"

openssl x509 -req -in server-csr.pem \
    -CA ca-cert.pem -CAkey ca-key.pem -CAcreateserial \
    -out server-cert.pem -days 90

# In your NGINX config, enforce mTLS:
# ssl_client_certificate /etc/pki/internal-ca.pem;
# ssl_verify_client on;
Step 4: Least-Privilege Access with RBAC
Zero Trust demands that every user and process operates with the minimum privileges necessary. On Linux, this means going far beyond simple user/group permissions.
4.1 Granular sudo Rules
# /etc/sudoers.d/zero-trust-roles

# SRE team: can restart services and view logs
%sre-team ALL=(ALL) NOPASSWD: /usr/bin/systemctl restart *, \
    /usr/bin/journalctl *

# DB admins: can only manage PostgreSQL
%db-admins ALL=(postgres) NOPASSWD: /usr/bin/psql, \
    /usr/bin/pg_dump, /usr/bin/pg_restore

# Developers: no sudo access at all (use CI/CD for deployments)
# (intentionally empty)

# Security team: can run audit tools
%security-team ALL=(ALL) NOPASSWD: /usr/sbin/ausearch, \
    /usr/bin/aide --check, /usr/sbin/ss, /usr/bin/last
4.2 Process Isolation with systemd
Use systemd security directives to sandbox every service:
# /etc/systemd/system/myapp.service.d/security.conf
[Service]
# Filesystem isolation
ProtectHome=yes
ProtectSystem=strict
ReadWritePaths=/var/lib/myapp /var/log/myapp
PrivateTmp=yes

# Network isolation
RestrictAddressFamilies=AF_INET AF_INET6
IPAddressDeny=any
IPAddressAllow=10.10.2.0/24

# Privilege restrictions
NoNewPrivileges=yes
CapabilityBoundingSet=CAP_NET_BIND_SERVICE
AmbientCapabilities=CAP_NET_BIND_SERVICE

# System call filtering
SystemCallFilter=@system-service
SystemCallArchitectures=native
Step 5: Continuous Monitoring and Threat Detection
Zero Trust is not a one-time implementation — it requires continuous verification. Your monitoring stack must detect anomalies in real time and trigger automated responses.
5.1 Centralized Logging with auditd
# /etc/audit/rules.d/zero-trust.rules

# Monitor all authentication events
-w /etc/pam.d/ -p wa -k auth_changes
-w /etc/ssh/sshd_config -p wa -k ssh_config_change

# Monitor privilege escalation
-w /etc/sudoers -p wa -k sudo_changes
-w /usr/bin/sudo -p x -k sudo_execution

# Monitor network configuration changes
-w /etc/sysconfig/network-scripts/ -p wa -k network_changes
-w /etc/nftables/ -p wa -k firewall_changes

# Monitor critical binary execution
-a always,exit -F arch=b64 -S execve -F path=/usr/bin/curl -k outbound_tools
-a always,exit -F arch=b64 -S execve -F path=/usr/bin/wget -k outbound_tools
-a always,exit -F arch=b64 -S execve -F path=/usr/bin/nc -k outbound_tools

# File integrity monitoring for critical paths
-w /etc/passwd -p wa -k identity_change
-w /etc/group -p wa -k identity_change
-w /etc/shadow -p wa -k identity_change
5.2 Intrusion Detection with OSSEC/Wazuh
Deploy Wazuh as your SIEM and intrusion detection system. It integrates perfectly with the Zero Trust model by providing continuous compliance monitoring:
# Install Wazuh agent
curl -s https://packages.wazuh.com/4.x/yum/wazuh.repo > /etc/yum.repos.d/wazuh.repo
sudo dnf install -y wazuh-agent

# Configure to report to your Wazuh manager
sudo sed -i 's/MANAGER_IP/10.10.40.10/' /var/ossec/etc/ossec.conf

# Enable real-time file integrity monitoring
# Add to ossec.conf:
# <syscheck>
#   <frequency>300</frequency>
#   <directories realtime="yes">/etc,/usr/bin,/usr/sbin</directories>
# </syscheck>

sudo systemctl enable --now wazuh-agent
5.3 Automated Threat Response
Create automated response scripts that trigger when threats are detected:
#!/bin/bash
# /usr/local/bin/zt-auto-response.sh
# Automated response to brute-force SSH attempts

THRESHOLD=5
LOG_FILE="/var/log/auth.log"

# Count failed SSH attempts per IP in last 10 minutes
declare -A ATTEMPTS
while IFS= read -r line; do
    IP=$(echo "$line" | grep -oP '\d+\.\d+\.\d+\.\d+')
    if [ -n "$IP" ]; then
        ATTEMPTS[$IP]=$(( ${ATTEMPTS[$IP]:-0} + 1 ))
    fi
done < <(journalctl -u sshd --since "10 min ago" | grep "Failed password")

# Block IPs exceeding threshold
for IP in "${!ATTEMPTS[@]}"; do
    if [ ${ATTEMPTS[$IP]} -ge $THRESHOLD ]; then
        logger -t zero-trust "Blocking $IP: ${ATTEMPTS[$IP]} failed attempts"
        nft add element inet zero_trust blocklist { $IP }
    fi
done
Step 6: Putting It All Together — The Zero Trust Checklist
Here is a comprehensive checklist for validating your Zero Trust implementation:
| Control | Implementation | Verification |
|---|---|---|
| No password SSH | sshd_config PasswordAuthentication no | ssh -o PreferredAuthentications=password should fail |
| SELinux enforcing | SELINUX=enforcing in /etc/selinux/config | getenforce returns "Enforcing" |
| Network segmentation | nftables zone-based rules | nmap from web zone cannot reach DB zone |
| mTLS between services | Internal CA with 90-day certificates | curl without client cert returns 403 |
| Audit logging | auditd rules + Wazuh SIEM | ausearch shows events, Wazuh dashboard populated |
| Least privilege | Granular sudoers + systemd sandboxing | Users cannot escalate beyond their role |
Frequently Asked Questions
Is Zero Trust only for large enterprises?
No. Zero Trust principles apply to any infrastructure, from a single VPS to a multi-cloud environment. The concepts of identity verification, least privilege, and micro-segmentation scale down just as well as they scale up. A small team running three Linux servers benefits from SSH certificates and network segmentation just as much as a Fortune 500 company.
How long does it take to implement Zero Trust on Linux?
A basic implementation covering SSH hardening, firewall segmentation, and auditd can be done in a single day. A full implementation including mTLS, certificate-based SSH, Wazuh SIEM integration, and automated responses typically takes 2-4 weeks for a production environment.
Does Zero Trust replace firewalls?
No — it enhances them. Firewalls (nftables/iptables) become part of the micro-segmentation layer in Zero Trust. The key difference is that Zero Trust does not rely on firewalls alone; it adds identity verification, encryption, and continuous monitoring on top of network controls.
What is the biggest mistake when implementing Zero Trust?
Trying to do everything at once. Start with the highest-impact controls: disable password authentication, enable SELinux, and set up basic network segmentation. Then layer on mTLS, certificate-based auth, and SIEM integration incrementally.
Can I use Zero Trust with Docker containers?
Absolutely. Docker and Kubernetes environments benefit enormously from Zero Trust. Use network policies for pod-level segmentation, service meshes (like Istio) for mTLS, and RBAC for access control. Our book Docker Security & Production Hardening covers this in detail.
Recommended Resources
Building a Zero Trust architecture requires deep knowledge across several domains. These books from our catalog provide the foundation you need:
- Linux Security Hardening — Comprehensive OS-level security for your Zero Trust foundation
- Linux Firewall Configuration — Master nftables and iptables for micro-segmentation
- SELinux & AppArmor Guide — Mandatory access controls explained
- Linux Intrusion Detection with OSSEC & Wazuh — Set up your SIEM and IDS
- Docker Security & Production Hardening — Extend Zero Trust to your containers