
Linux servers power the majority of the internet — from web applications to databases, from container orchestration platforms to CI/CD pipelines. With this responsibility comes an equally significant security burden. A single misconfigured service or an unpatched vulnerability can expose your entire infrastructure to attackers.
This comprehensive guide walks you through every aspect of Linux server hardening in 2026, from initial post-installation security baselines through advanced kernel tuning, mandatory access control, and continuous security monitoring. Whether you are managing a single VPS or a fleet of production servers, these practices will significantly reduce your attack surface.

1. Post-Installation Security Baseline
The first 30 minutes after installing a Linux server are the most critical. Before exposing the system to any network traffic, you must establish a security baseline that covers system updates, unnecessary service removal, and initial account hardening.
System Updates and Automatic Patching
Every hardening process begins with ensuring your system is fully up to date. On RHEL-based systems (AlmaLinux, Rocky Linux, Fedora), run dnf update -y && dnf upgrade -y followed by enabling automatic updates with dnf-automatic. For Debian/Ubuntu systems, use apt update && apt full-upgrade -y and install unattended-upgrades for automatic security patches.
Automatic updates are essential for production servers. The risk of an unpatched vulnerability being exploited far outweighs the small chance of an update causing issues. Configure automatic updates to apply security patches daily, but schedule full system updates during maintenance windows.
Removing Unnecessary Packages and Services
Every installed package and running service represents a potential attack vector. After updating, audit your system with systemctl list-unit-files --state=enabled to see all enabled services, and ss -tulnp to identify all listening ports. Disable and remove anything you do not explicitly need — this includes default mail servers, print services, Avahi/mDNS, and NFS if not required.
| Service | Command to Disable | Why Remove |
|---|---|---|
cups | systemctl disable --now cups | Print services rarely needed on servers |
avahi-daemon | systemctl disable --now avahi-daemon | mDNS service discovery — attack surface |
postfix | systemctl disable --now postfix | Local MTA not needed if using external mail |
rpcbind | systemctl disable --now rpcbind | NFS/RPC services — significant attack surface |
2. User Account and Authentication Security
Proper user management is fundamental to server security. This includes enforcing strong password policies, configuring sudo correctly, and ensuring no unnecessary accounts exist on the system.
Password Policy Enforcement
Use chage to set password aging policies: maximum age of 90 days, minimum of 7 days between changes, and 14-day warning before expiration. Configure PAM (Pluggable Authentication Modules) in /etc/security/pwquality.conf to enforce password complexity — minimum 12 characters, requiring uppercase, lowercase, digits, and special characters.
Critically, lock the root account with passwd -l root and disable root shell login with usermod -s /sbin/nologin root. All administrative access should go through named user accounts and sudo, creating a clear audit trail of who did what.
Sudo Hardening
Never use NOPASSWD in production sudo configurations. Configure sudo to log all commands to /var/log/sudo.log, enable input/output logging, require TTY, and set reasonable timeouts. Use visudo exclusively to edit sudoers files — it validates syntax before saving, preventing lockouts.

3. SSH Hardening
SSH is the primary remote access method for Linux servers, making it the most targeted service by attackers. A properly hardened SSH configuration is your first line of defense.
Essential sshd_config Settings
Start by changing the default SSH port from 22 to a non-standard port (e.g., 2222). While this is not a security measure per se, it dramatically reduces automated scanning and brute-force attempts. More importantly, disable root login entirely with PermitRootLogin no, disable password authentication with PasswordAuthentication no (requiring key-based authentication), and whitelist specific users with AllowUsers.
Set MaxAuthTries 3 to limit login attempts, configure idle timeouts with ClientAliveInterval 300 and ClientAliveCountMax 2 (disconnecting after 10 minutes of inactivity), and disable unnecessary features like X11 forwarding and TCP forwarding.
Modern Cipher Configuration
Restrict SSH to modern, secure ciphers only. Use chacha20-poly1305 and aes256-gcm for encryption, hmac-sha2-512-etm and hmac-sha2-256-etm for message authentication, and curve25519-sha256 for key exchange. This eliminates legacy algorithms that may have known weaknesses.
Pro Tip: Always test your SSH configuration withsshd -tbefore restarting the service. A syntax error insshd_configcan lock you out of your server entirely.
SSH Key Management Best Practices
Generate Ed25519 keys (ssh-keygen -t ed25519) for all new key pairs — they are more secure and performant than RSA keys. Set correct permissions: 700 for ~/.ssh, 600 for private keys and authorized_keys. Use ProxyJump instead of agent forwarding when connecting through bastion/jump hosts, as agent forwarding exposes your key to the intermediate host.
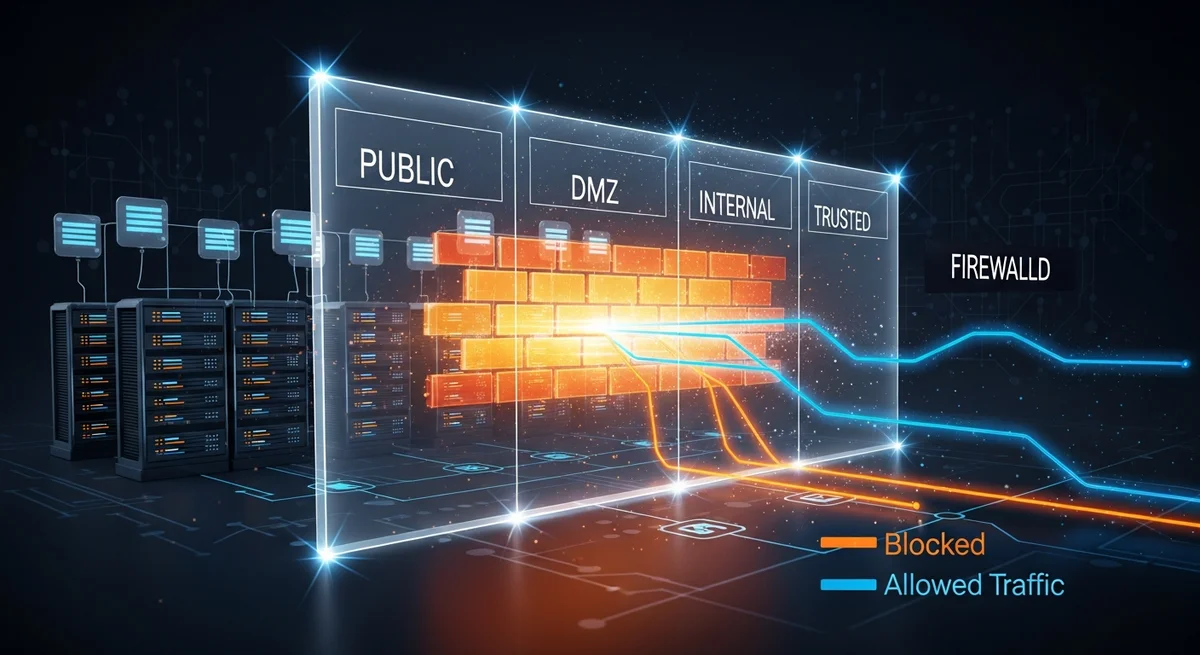
4. Firewall Configuration: FirewallD vs nftables
A properly configured firewall is non-negotiable for any production server. Linux offers two primary firewall management frameworks: FirewallD (zone-based, higher-level) and nftables (direct packet filtering, replaces iptables).
FirewallD: Zone-Based Management
FirewallD is the default on RHEL-based distributions and provides a user-friendly, zone-based approach to firewall management. The key principle is to set the most restrictive default zone (drop), then explicitly allow only required services and ports.
Use rich rules for advanced scenarios like IP whitelisting for SSH access: only allow connections to your SSH port from specific management IP addresses. Implement rate limiting for public-facing services to mitigate DDoS attempts. Always use the --permanent flag followed by --reload to ensure rules persist across reboots.
For advanced scenarios, create IP sets for managing blocklists efficiently. Rather than adding individual IPs to firewall rules, maintain named sets that can be referenced from zone configurations. Enable denied packet logging with --set-log-denied=all to monitor blocked connection attempts.
nftables: Modern Packet Filtering
nftables is the successor to iptables and offers several advantages: atomic rule updates (the entire ruleset loads or fails — no partial states), better performance through maps and sets, and a cleaner, more consistent syntax. On modern distributions, even FirewallD uses nftables as its backend.
A basic server ruleset should follow the principle of default deny: set the input chain policy to drop, accept established/related connections, accept loopback traffic, then explicitly whitelist SSH, HTTP, and HTTPS ports. Use named sets for trusted IP ranges and dynamic sets with timeouts for rate limiting.
| Feature | FirewallD | nftables |
|---|---|---|
| Ease of use | Higher — zone-based abstraction | Lower — requires understanding packet flow |
| Performance | Good (uses nftables backend) | Best — native kernel interface |
| Atomic updates | Via nftables backend | Native — entire ruleset loads atomically |
| Dynamic rules | Rich rules, IP sets | Maps, sets, meters, dynamic sets |
| Best for | Standard server management | Complex rules, high-performance needs |
5. Kernel Security and Sysctl Tuning
The Linux kernel exposes hundreds of tunable parameters through /proc/sys/ that directly impact security. Applying the right sysctl parameters can prevent entire classes of network attacks and reduce information leakage.
Network Security Parameters
Disable IP forwarding unless the server specifically functions as a router (net.ipv4.ip_forward = 0). Disable ICMP redirects to prevent man-in-the-middle attacks. Enable reverse path filtering (rp_filter = 1) to prevent IP spoofing. Enable SYN cookies (tcp_syncookies = 1) to protect against SYN flood attacks. Log martian packets to identify suspicious traffic.
Memory and Process Protection
Restrict kernel pointer leaks (kptr_restrict = 2) and dmesg access (dmesg_restrict = 1) to prevent information disclosure. Enable full ASLR (randomize_va_space = 2) to randomize memory layouts. Restrict ptrace to parent processes (yama.ptrace_scope = 1) to prevent process injection attacks. Disable eBPF for unprivileged users to prevent kernel exploitation.
Kernel Module Hardening
Blacklist unused filesystem modules (cramfs, freevxfs, hfs, jffs2, udf) and protocols to reduce the kernel attack surface. If the server has no USB devices, disable usb-storage entirely. Each loaded module represents potential kernel-level attack surface that should be eliminated if not needed.
6. File System Security
File system hardening involves three key areas: correct file permissions, secure mount options, and file integrity monitoring.
Critical File Permissions
Ensure sensitive files have restrictive permissions: 600 for /etc/shadow and /etc/gshadow, 700 for /root, and 600 for /boot/grub2/grub.cfg. Regularly audit for SUID/SGID files (find / -perm -4000) — each one is a potential privilege escalation vector. Find and investigate world-writable files and orphaned files (those with no valid owner/group).
Secure Mount Options
Use noexec, nosuid, and nodev mount options on /tmp, /var/tmp, and /dev/shm. The noexec option prevents execution of any binaries from these directories — a common technique used by attackers who upload malware to temporary directories. Apply nosuid to /home and /var to prevent privilege escalation through SUID binaries in user-writable locations.
File Integrity Monitoring with AIDE
Install AIDE (Advanced Intrusion Detection Environment) to monitor critical system files for unauthorized changes. Initialize the database with aide --init, then schedule daily checks with aide --check. Any unexpected file changes — modified binaries, altered configurations, new files in system directories — trigger alerts for investigation.
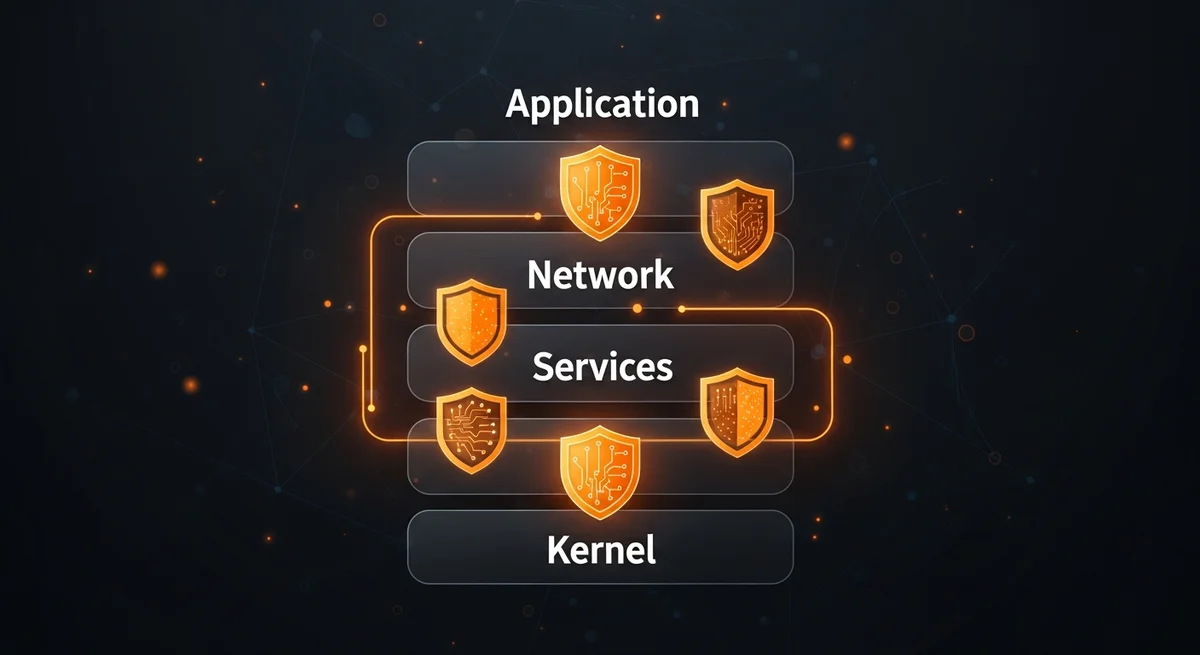
7. systemd Service Hardening
systemd provides powerful sandboxing features that most administrators underutilize. By adding security directives to service unit files, you can significantly limit the damage a compromised service can cause.
Key directives include: ProtectSystem=strict (read-only filesystem), ProtectHome=true (hide home directories), PrivateTmp=true (private /tmp namespace), NoNewPrivileges=true (prevent privilege escalation), and MemoryDenyWriteExecute=true (prevent code injection).
Use systemd-analyze security to score all services on a 0-10 scale (lower is more secure). Aim for scores below 5.0 on all public-facing services. This tool identifies which security features are missing and provides actionable recommendations.

8. Intrusion Detection and Security Monitoring
Hardening is only half the equation — you also need to detect and respond to security events. A comprehensive monitoring strategy includes brute-force protection, rootkit detection, audit logging, and automated alerting.
Fail2ban for Brute-Force Protection
Fail2ban monitors log files for failed authentication attempts and automatically bans offending IP addresses. Configure it with aggressive settings for SSH: 3 maximum retries within 10 minutes, resulting in a 24-hour ban. Use the nftables backend for efficient IP blocking. Extend Fail2ban to protect other services — web applications, mail servers, and any service with authentication logs.
Linux Audit Framework (auditd)
The audit framework provides kernel-level event logging that cannot be bypassed by user-space processes. Configure audit rules to watch critical files (/etc/passwd, /etc/shadow, /etc/sudoers), log all command execution via the execve system call, and monitor privilege escalation attempts. Use ausearch and aureport to analyze audit logs efficiently.
Rootkit Detection
Schedule regular rootkit scans with rkhunter and chkrootkit. These tools check for known rootkit signatures, suspicious file modifications, hidden processes, and other indicators of compromise. Run scans daily via cron and email the results to your security team.
9. Mandatory Access Control: SELinux and AppArmor
Traditional Unix permissions (DAC — Discretionary Access Control) are insufficient for modern security requirements. Mandatory Access Control (MAC) systems add an additional security layer that confines processes to their minimum required permissions.
SELinux (RHEL/AlmaLinux/Fedora) provides type enforcement, role-based access control, and multi-level security. Never disable SELinux in production — instead, learn to manage contexts with chcon, restorecon, and semanage, control booleans with setsebool, and create custom policies with audit2allow when needed.
AppArmor (Debian/Ubuntu) uses path-based profiles that are simpler to write and understand. Use aa-genprof to automatically generate profiles by running the application through all its normal operations, then switch to enforce mode. Both systems provide essential protection against zero-day exploits by limiting what a compromised process can access.
10. Security Audit Checklist
Use this checklist during initial deployment and monthly security reviews:
| Category | Verification |
|---|---|
| System Updates | All packages updated, automatic updates enabled |
| User Accounts | No unused accounts, root login disabled, password policies enforced |
| SSH Hardening | Key-only auth, non-standard port, root login disabled, modern ciphers |
| Firewall Active | Default deny policy, only required ports open, rate limiting enabled |
| Kernel Hardening | Sysctl parameters applied, unused modules blacklisted |
| File Permissions | SUID/SGID audited, /tmp noexec, critical files protected |
| Service Isolation | systemd sandboxing enabled, capabilities dropped, resource limits set |
| MAC Enabled | SELinux enforcing / AppArmor profiles loaded for all services |
| Intrusion Detection | Fail2ban active, AIDE monitoring, rkhunter scheduled |
| Logging | auditd rules configured, centralized logging, automated alerts |
Free Cheat Sheet Download
We have created a comprehensive 20-page Linux Server Hardening cheat sheet that condenses all the information from this guide into a quick-reference PDF. It includes every command, configuration example, and checklist covered above — perfect for printing and keeping at your workstation.
Download the free Linux Server Hardening Cheat Sheet (PDF)
Related Resources
Deepen your knowledge with these related Dargslan resources:
- Linux System Hardening — Complete eBook on system-level security
- Linux Security Hardening — Advanced security techniques and frameworks
- Firewall Configuration: The Complete Guide — Deep dive into FirewallD and nftables
- SSH Mastery: Secure Remote Administration — Advanced SSH techniques
- Linux Security Auditing — Compliance and security assessment
- Browse all 205+ free IT cheat sheets
Conclusion
Linux server hardening is not a one-time task — it is a continuous process that requires regular auditing, monitoring, and adaptation to new threats. By implementing the practices outlined in this guide — from SSH hardening and firewall configuration through kernel security, mandatory access control, and intrusion detection — you create a defense-in-depth strategy that significantly reduces your attack surface.
Remember: security is about layers. No single measure is sufficient on its own, but together they create a robust security posture that protects your infrastructure against the vast majority of attacks. Start with the basics, implement them thoroughly, and gradually add more advanced protections as your expertise grows.


