
Docker has fundamentally changed how developers build, ship, and run applications. By packaging your code and all its dependencies into lightweight, portable containers, Docker eliminates the "works on my machine" problem and enables consistent deployments from development laptops to production servers. Whether you're a developer, system administrator, or DevOps engineer, understanding Docker is no longer optional — it's essential.
This comprehensive guide covers everything you need to master Docker in 2026: from core concepts and installation to multi-stage builds, networking, Docker Compose, security hardening, and production best practices. Every section includes real-world examples and commands you can run immediately.
What is Docker?
Docker is an open-source platform that automates the deployment, scaling, and management of applications using containerization. A container packages an application with everything it needs to run — code, runtime, system libraries, and configuration — into a single, portable unit that runs consistently on any infrastructure.
Unlike traditional deployment where you install dependencies directly on servers (and pray nothing conflicts), Docker containers are isolated environments that share the host operating system's kernel. This makes them dramatically faster and more lightweight than virtual machines while providing the same level of application isolation.
Why Docker Matters in 2026
- Consistency: Identical environment from development to production — no more debugging environment-specific issues
- Speed: Containers start in seconds (not minutes like VMs) and use minimal resources
- Portability: Build once, run anywhere — laptop, on-premises server, AWS, Azure, or GCP
- Microservices: Perfect for breaking monoliths into independently deployable services
- CI/CD: Enables automated build, test, and deploy pipelines with reproducible environments
- Ecosystem: Docker Hub offers 100,000+ pre-built images for any technology stack
- Industry standard: Over 60% of organizations use containers in production (CNCF Survey 2025)
Docker vs Virtual Machines
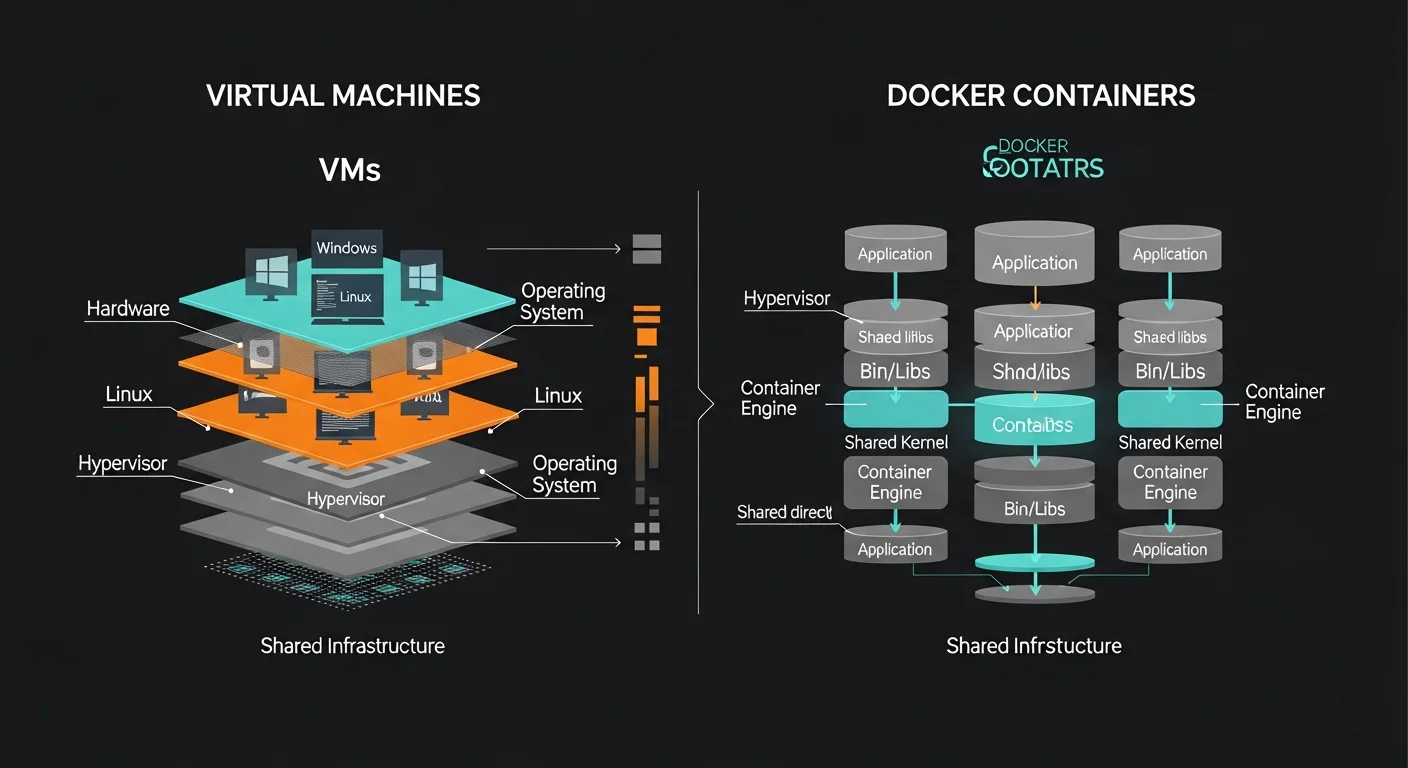
Understanding the difference between containers and virtual machines is fundamental to understanding Docker's value proposition.
| Feature | Docker Container | Virtual Machine |
|---|---|---|
| Size | 10-500 MB | 1-50 GB |
| Startup Time | Seconds | Minutes |
| OS | Shares host kernel | Full guest OS |
| Isolation | Process-level (namespaces, cgroups) | Hardware-level (hypervisor) |
| Performance | Near-native | 5-20% overhead |
| Density | 100s per host | 10s per host |
| Portability | Excellent (OCI standard) | Good (format-dependent) |
| Resource Usage | Shares host resources efficiently | Reserved per VM |
| Best For | Microservices, CI/CD, cloud-native | Full OS isolation, legacy apps |
Key insight: Containers are not lightweight VMs. They are isolated processes running on the host kernel. This fundamental difference is why containers start instantly and can run hundreds per host, while VMs need their own operating system and boot sequence.
Docker Architecture Deep Dive
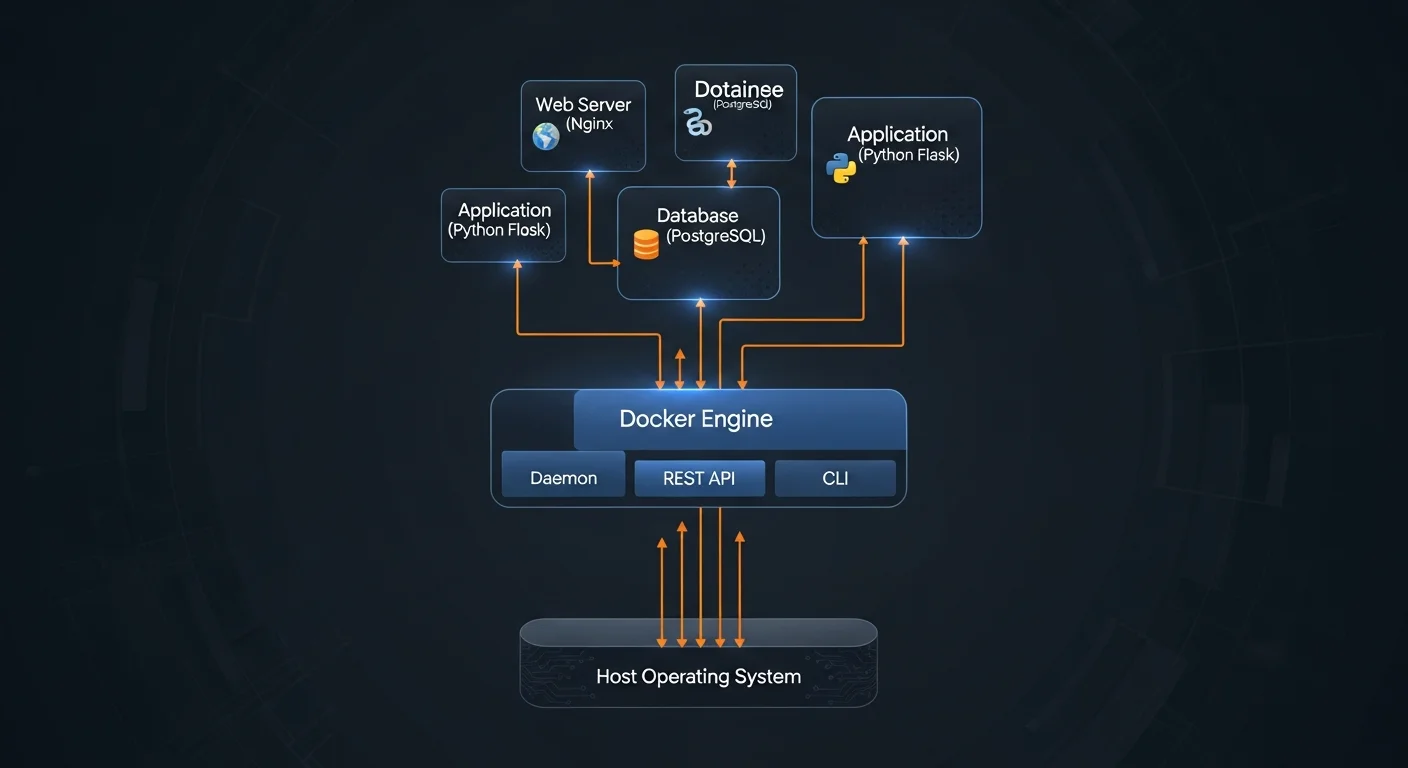
Docker uses a client-server architecture with several components working together:
Core Components
- Docker Client (docker CLI): The command-line tool you interact with. Sends commands to the Docker daemon via REST API. You can connect to local or remote daemons.
- Docker Daemon (dockerd): The background service that manages images, containers, networks, and volumes. Listens for API requests from the client.
- containerd: Industry-standard container runtime (CNCF graduated project) that manages the complete container lifecycle — image transfer, storage, execution, and supervision.
- runc: Low-level OCI-compliant runtime that actually creates and runs containers using Linux kernel features (namespaces, cgroups).
Image Layer System
Docker images are built from read-only layers. Each instruction in a Dockerfile creates a new layer. This layered architecture enables:
- Layer sharing: Multiple images can share base layers, saving disk space
- Build caching: Only changed layers need to be rebuilt
- Copy-on-Write: Containers get a thin writable layer on top of the image layers
# Each instruction creates a layer:
FROM ubuntu:22.04        # Layer 1: Base OS (~72 MB)
RUN apt install nginx    # Layer 2: Nginx package (~50 MB)
COPY app/ /var/www/      # Layer 3: Application files (~5 MB)
CMD ["nginx", "-g", "daemon off;"]  # Metadata only

# Inspect layers:
docker history myapp:latest
Installation & Setup
Linux Installation (Ubuntu/Debian)
# Remove old versions
sudo apt remove docker docker-engine docker.io containerd runc

# Install prerequisites
sudo apt update
sudo apt install ca-certificates curl gnupg

# Add Docker's official GPG key
sudo install -m 0755 -d /etc/apt/keyrings
curl -fsSL https://download.docker.com/linux/ubuntu/gpg | \
  sudo gpg --dearmor -o /etc/apt/keyrings/docker.gpg

# Add repository and install
sudo apt update
sudo apt install docker-ce docker-ce-cli containerd.io docker-buildx-plugin docker-compose-plugin

# Run Docker without sudo
sudo usermod -aG docker $USER
newgrp docker

# Verify installation
docker run hello-world
Other Platforms
- macOS: Download Docker Desktop — includes Engine, CLI, Compose, and a GUI dashboard
- Windows: Docker Desktop with WSL 2 backend — requires Windows 10/11 (Pro or Home)
- RHEL/CentOS/Fedora:
sudo dnf install docker-ce docker-ce-cli containerd.io
Post-Installation Configuration
# Configure Docker daemon (/etc/docker/daemon.json)
{
  "log-driver": "json-file",
  "log-opts": {
    "max-size": "10m",
    "max-file": "3"
  },
  "storage-driver": "overlay2",
  "default-address-pools": [
    {"base": "172.17.0.0/16", "size": 24}
  ]
}

# Apply and enable
sudo systemctl restart docker
sudo systemctl enable docker
Security note: Adding a user to the docker group grants root-equivalent access to the host system. In production environments, consider using rootless Docker or require sudo for Docker commands.
Docker Images

Images are read-only templates containing your application code, runtime, libraries, and configuration. They are the blueprint from which containers are created.
Essential Image Commands
| Command | Description |
|---|---|
docker pull nginx:1.25 | Download image from registry |
docker images | List all local images |
docker build -t myapp:1.0 . | Build image from Dockerfile |
docker tag myapp:1.0 user/myapp:1.0 | Tag image for registry |
docker push user/myapp:1.0 | Push to registry |
docker rmi myapp:1.0 | Remove image |
docker image prune -a | Remove all unused images |
docker history myapp:1.0 | Show image layer history |
docker inspect myapp:1.0 | Detailed image metadata (JSON) |
Image Naming Convention
# Full image reference format:
registry.example.com/namespace/repository:tag

# Examples:
nginx                          # Docker Hub, latest tag (implicit)
nginx:1.25-alpine              # Specific version, Alpine base
postgres:16-alpine             # PostgreSQL 16, Alpine
ghcr.io/owner/app:v2.1.0       # GitHub Container Registry
registry.example.com/app:prod  # Private registry

# Alpine variants are significantly smaller:
node:20          # ~350 MB (Debian-based)
node:20-slim     # ~70 MB (Debian slim)
node:20-alpine   # ~50 MB (Alpine Linux)
Never use :latest in production. Always pin specific version tags (e.g., nginx:1.25.4-alpine) for reproducible, predictable deployments.
Dockerfile Reference
A Dockerfile is a text file containing instructions to build a Docker image. Each instruction creates a new layer in the image.
Key Instructions
| Instruction | Purpose |
|---|---|
FROM | Base image (required, must be first instruction) |
RUN | Execute command during build (creates new layer) |
COPY | Copy files from build context to image |
WORKDIR | Set working directory for subsequent instructions |
ENV | Set environment variable (persists at runtime) |
ARG | Build-time variable (not available at runtime) |
EXPOSE | Document which port the container listens on |
CMD | Default command when container starts (overridable) |
ENTRYPOINT | Main executable (not easily overridden) |
USER | Switch to non-root user for security |
HEALTHCHECK | Define how to check if the container is healthy |
VOLUME | Create mount point for persistent data |
Production-Ready Dockerfile Example
FROM node:20-alpine AS builder
WORKDIR /app
COPY package*.json ./
RUN npm ci --only=production
COPY . .
RUN npm run build

FROM node:20-alpine
RUN addgroup -S app && adduser -S app -G app
WORKDIR /app
COPY --from=builder /app/dist ./dist
COPY --from=builder /app/node_modules ./node_modules
USER app
EXPOSE 3000
HEALTHCHECK --interval=30s --timeout=3s \
  CMD wget -qO- http://localhost:3000/health || exit 1
CMD ["node", "dist/server.js"]
Optimization tip: Copy package*.json before COPY . . to leverage Docker's layer caching. Dependencies change less frequently than source code, so this avoids reinstalling packages on every build.
Multi-Stage Builds
Multi-stage builds are one of Docker's most powerful features. They let you use multiple FROM statements in a single Dockerfile, copying only the artifacts you need from build stages to the final image.
Benefits
- Dramatically smaller images: Go application from 1.2 GB to 15 MB
- Better security: No compilers, package managers, or build tools in production
- Single Dockerfile: Build and runtime in one file, no separate scripts needed
- Cache efficiency: Builder stage cached separately from runtime
Go Application (Multi-Stage)
# Stage 1: Build
FROM golang:1.22-alpine AS builder
WORKDIR /app
COPY go.mod go.sum ./
RUN go mod download
COPY . .
RUN CGO_ENABLED=0 GOOS=linux go build -o /app/server .

# Stage 2: Runtime (scratch = empty image, ~0 bytes)
FROM scratch
COPY --from=builder /app/server /server
COPY --from=builder /etc/ssl/certs /etc/ssl/certs
EXPOSE 8080
ENTRYPOINT ["/server"]

# Result: ~15 MB instead of 1.2 GB!
Python Application (Multi-Stage)
FROM python:3.12-slim AS builder
WORKDIR /app
COPY requirements.txt .
RUN pip install --user --no-cache-dir -r requirements.txt
COPY . .

FROM python:3.12-slim
WORKDIR /app
COPY --from=builder /root/.local /root/.local
COPY --from=builder /app .
ENV PATH=/root/.local/bin:$PATH
USER 1001
EXPOSE 5000
CMD ["gunicorn", "-b", "0.0.0.0:5000", "app:app"]
React/Vite Frontend (Multi-Stage)
FROM node:20-alpine AS build
WORKDIR /app
COPY package*.json ./
RUN npm ci
COPY . .
RUN npm run build

FROM nginx:alpine
COPY --from=build /app/dist /usr/share/nginx/html
COPY nginx.conf /etc/nginx/conf.d/default.conf
EXPOSE 80
# Result: ~25 MB with Nginx serving static files
Container Management
Running Containers
# Basic run
docker run nginx

# Detached mode with name and port mapping
docker run -d --name web -p 8080:80 nginx

# Interactive with terminal
docker run -it ubuntu:22.04 bash

# With environment variables
docker run -d \
  -e POSTGRES_PASSWORD=secret \
  -e POSTGRES_DB=myapp \
  postgres:16-alpine

# With volume and resource limits
docker run -d \
  --name db \
  --memory=512m \
  --cpus=1.5 \
  -v pgdata:/var/lib/postgresql/data \
  -p 5432:5432 \
  postgres:16-alpine

# Auto-remove when stopped
docker run --rm -it python:3.12 python

# With restart policy
docker run -d --restart=unless-stopped nginx
Management Commands
| Command | Description |
|---|---|
docker ps | List running containers |
docker ps -a | List all containers (including stopped) |
docker stop <id> | Gracefully stop (sends SIGTERM, then SIGKILL) |
docker start <id> | Start a stopped container |
docker restart <id> | Stop and start a container |
docker rm <id> | Remove stopped container |
docker rm -f <id> | Force remove running container |
docker logs -f <id> | Follow container logs in real-time |
docker exec -it <id> bash | Open shell inside running container |
docker stats | Live resource usage for all containers |
docker inspect <id> | Detailed container info (JSON) |
Restart Policies
| Policy | Behavior |
|---|---|
no | Never restart (default) |
on-failure[:N] | Restart only on non-zero exit code (optionally max N times) |
always | Always restart, even after daemon restart |
unless-stopped | Like always, but not if manually stopped before daemon restart |
Volumes & Data Persistence
Containers are ephemeral by design — when you remove a container, all data inside it is lost. Volumes provide persistent storage that survives container lifecycle changes.
Storage Types
| Type | Syntax | Best For |
|---|---|---|
| Named Volume | -v mydata:/data | Database storage, persistent application data |
| Bind Mount | -v /host/path:/data | Development (live code reload) |
| tmpfs Mount | --tmpfs /tmp | Temporary data, secrets in memory |
Volume Commands
# Create named volume
docker volume create pgdata

# List volumes
docker volume ls

# Use volume with container
docker run -d \
  -v pgdata:/var/lib/postgresql/data \
  -e POSTGRES_PASSWORD=secret \
  postgres:16-alpine

# Read-only mount
docker run -d -v config:/etc/app:ro myapp

# Backup volume to tarball
docker run --rm \
  -v pgdata:/data \
  -v $(pwd):/backup \
  alpine tar czf /backup/pgdata-backup.tar.gz -C /data .

# Restore from backup
docker run --rm \
  -v pgdata:/data \
  -v $(pwd):/backup \
  alpine tar xzf /backup/pgdata-backup.tar.gz -C /data
Critical: Any data written inside a container (not to a volume) is permanently lost when the container is removed. Always use named volumes for databases, uploads, and any data that must persist.
Docker Networking
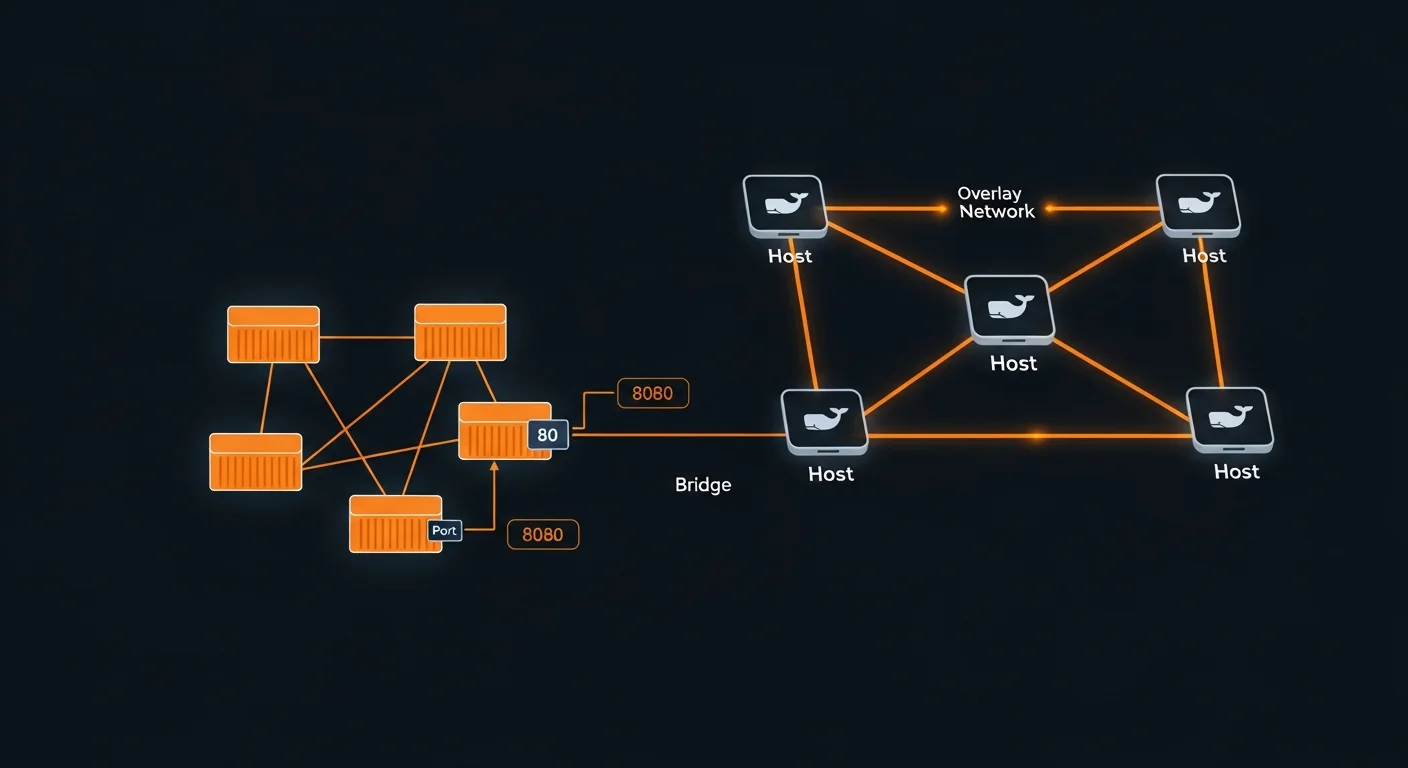
Docker networking enables containers to communicate with each other and the outside world. Understanding the different network drivers is crucial for building multi-container applications.
Network Drivers
| Driver | Isolation | Use Case |
|---|---|---|
| bridge | Per-network | Default — containers communicate by name on custom networks |
| host | None | Container shares host network (best performance, no isolation) |
| overlay | Multi-host | Docker Swarm — spans multiple Docker hosts |
| macvlan | Physical LAN | Container gets its own MAC address on physical network |
| none | Complete | No network connectivity |
Network Commands
# Create custom bridge network
docker network create mynet

# Run containers on the same network
docker run -d --name db --network mynet postgres:16
docker run -d --name app --network mynet myapp
# "app" can reach "db" at hostname "db"

# Port mapping
docker run -p 8080:80 nginx          # host:8080 -> container:80
docker run -p 127.0.0.1:8080:80 nginx  # localhost only
docker run -P nginx                    # auto-assign random host ports

# Connect existing container to network
docker network connect mynet existing-container

# DNS resolution (automatic on custom networks)
docker exec app ping db  # resolves to db container's IP
Best practice: Always create custom bridge networks instead of using the default bridge. Custom networks provide automatic DNS-based service discovery — containers can reach each other by name without knowing IP addresses.
Docker Compose
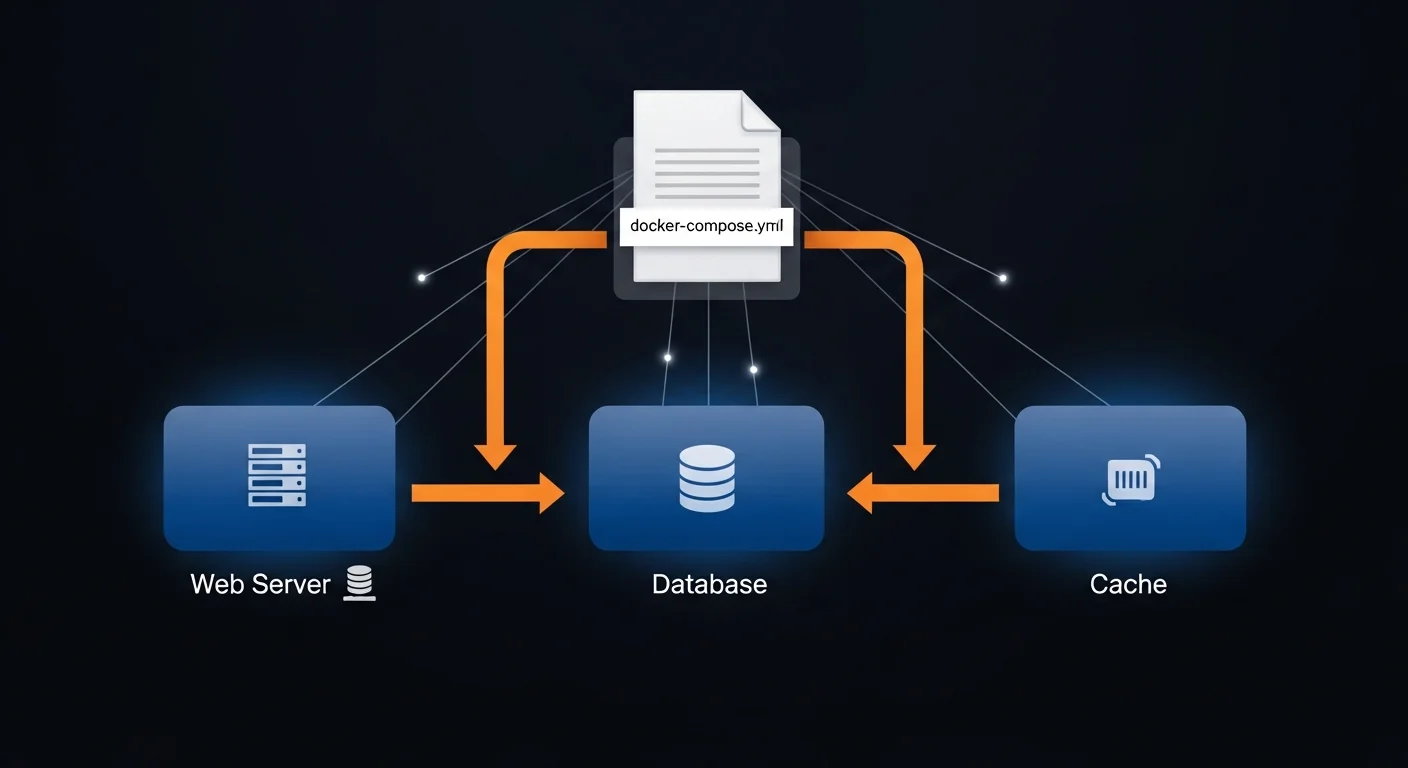
Docker Compose is a tool for defining and running multi-container applications. With a single YAML file, you configure all your services, networks, and volumes, then start everything with one command.
Complete Compose Example
# compose.yml (or docker-compose.yml)
services:
  web:
    build: .
    ports:
      - "3000:3000"
    environment:
      - DATABASE_URL=postgres://user:pass@db:5432/mydb
      - REDIS_URL=redis://cache:6379
    depends_on:
      db:
        condition: service_healthy
      cache:
        condition: service_started
    restart: unless-stopped

  db:
    image: postgres:16-alpine
    environment:
      POSTGRES_DB: mydb
      POSTGRES_USER: user
      POSTGRES_PASSWORD: pass
    volumes:
      - pgdata:/var/lib/postgresql/data
    healthcheck:
      test: ["CMD-SHELL", "pg_isready -U user -d mydb"]
      interval: 10s
      timeout: 5s
      retries: 5
      start_period: 30s

  cache:
    image: redis:7-alpine
    command: redis-server --maxmemory 256mb --maxmemory-policy allkeys-lru

volumes:
  pgdata:
Compose Commands
| Command | Description |
|---|---|
docker compose up -d | Start all services in background |
docker compose down | Stop and remove containers and networks |
docker compose down -v | Also remove volumes (destroys data!) |
docker compose ps | List running services and their status |
docker compose logs -f web | Follow logs for a specific service |
docker compose build | Rebuild images from Dockerfiles |
docker compose exec web bash | Open shell in running service |
docker compose pull | Pull latest images for all services |
Environment Variables & Profiles
# .env file (auto-loaded by Compose)
APP_PORT=3000
DB_PASSWORD=supersecret
APP_VERSION=2.1.0

# compose.yml using variables
services:
  web:
    image: "myapp:${APP_VERSION:-latest}"
    ports:
      - "${APP_PORT:-3000}:3000"

  debug:
    image: busybox
    profiles:
      - debug
    # Only starts with: docker compose --profile debug up

# Multiple compose files (override pattern)
docker compose -f compose.yml -f compose.prod.yml up -d
Docker Registry & Distribution
A Docker registry is a storage and distribution service for Docker images. Docker Hub is the default public registry, but you can also use cloud provider registries or run your own.
Docker Hub
# Login and push to Docker Hub
docker login
docker tag myapp:1.0 username/myapp:1.0
docker push username/myapp:1.0

# Pull from Docker Hub
docker pull username/myapp:1.0
Cloud Provider Registries
# AWS ECR (Elastic Container Registry)
aws ecr get-login-password | docker login --username AWS \
  --password-stdin 123456789.dkr.ecr.eu-central-1.amazonaws.com

# GitHub Container Registry
echo $CR_PAT | docker login ghcr.io -u USERNAME --password-stdin
docker push ghcr.io/owner/myapp:1.0

# Google Artifact Registry
gcloud auth configure-docker europe-west1-docker.pkg.dev
docker push europe-west1-docker.pkg.dev/project/repo/myapp:1.0
Self-Hosted Registry
# Run private registry
docker run -d -p 5000:5000 --name registry \
  -v registry_data:/var/lib/registry \
  registry:2

# Push to private registry
docker tag myapp:1.0 localhost:5000/myapp:1.0
docker push localhost:5000/myapp:1.0

# For production, use Harbor (CNCF) for:
# - Vulnerability scanning
# - Role-based access control
# - Image replication across registries
Docker Security
Container security is a multi-layered concern. From the images you use to how you run containers, every decision impacts your security posture.
Image Security Best Practices
- Use official images: Start from verified images on Docker Hub (node, python, nginx)
- Pin specific versions: Use
node:20.11.1-alpinenotnode:latest - Use minimal bases: Alpine (~5 MB), slim (~70 MB), or distroless (Google) images
- Scan for vulnerabilities: Use Docker Scout, Trivy, or Snyk in your CI pipeline
- Never embed secrets: No API keys, passwords, or certificates in images
- Use .dockerignore: Exclude
.git,node_modules,.env, and test files
Runtime Security
# Run as non-root user (Dockerfile)
FROM node:20-alpine
RUN addgroup -S app && adduser -S app -G app
USER app

# Read-only filesystem
docker run --read-only --tmpfs /tmp --tmpfs /var/run myapp

# Drop all capabilities, add only what's needed
docker run --cap-drop ALL --cap-add NET_BIND_SERVICE myapp

# Prevent privilege escalation
docker run --security-opt no-new-privileges myapp

# Image scanning
docker scout cves myapp:latest
trivy image myapp:latest
Golden rule: Never run containers as root in production. Always use the USER instruction in your Dockerfile and --security-opt no-new-privileges at runtime.
Health Checks & Resource Limits
HEALTHCHECK Instruction
# HTTP health check
HEALTHCHECK --interval=30s --timeout=3s --retries=3 \
  --start-period=10s \
  CMD curl -f http://localhost:3000/health || exit 1

# Database health check
HEALTHCHECK --interval=10s --timeout=5s --retries=5 \
  CMD pg_isready -U postgres || exit 1

# Check container health status
docker inspect --format='{{.State.Health.Status}}' mycontainer
# Returns: starting | healthy | unhealthy
Resource Constraints
# Memory limits (OOM killer activates at limit)
docker run --memory=512m --memory-swap=1g myapp

# CPU limits
docker run --cpus=1.5 myapp          # Max 1.5 CPU cores
docker run --cpu-shares=512 myapp    # Relative weight (default: 1024)

# In Docker Compose
services:
  web:
    deploy:
      resources:
        limits:
          cpus: "1.0"
          memory: 512M
        reservations:
          cpus: "0.25"
          memory: 128M
Logging & Monitoring
Container Logs
# View all logs
docker logs <container>

# Follow logs in real-time
docker logs -f <container>

# Last 100 lines with timestamps
docker logs --tail 100 -t <container>

# Logs since specific time
docker logs --since 2026-03-12T10:00:00 <container>
Log Drivers
Docker supports multiple log drivers for routing container output to different destinations:
- json-file: Default — writes JSON logs to local files
- local: Optimized local storage with automatic rotation
- syslog: Routes to syslog daemon for centralized logging
- fluentd: Sends to Fluentd for EFK (Elasticsearch-Fluentd-Kibana) stack
- awslogs: Sends to AWS CloudWatch Logs
- gcplogs: Sends to Google Cloud Logging
Always configure log rotation to prevent disk space exhaustion. Without limits, container logs can fill up your disk in hours under heavy load. Set max-size and max-file in /etc/docker/daemon.json.
Monitoring
# Real-time resource stats
docker stats

# Formatted output
docker stats --format "table {{.Name}}\t{{.CPUPerc}}\t{{.MemUsage}}"

# System disk usage
docker system df

# Real-time events
docker system events
Docker in CI/CD Pipelines
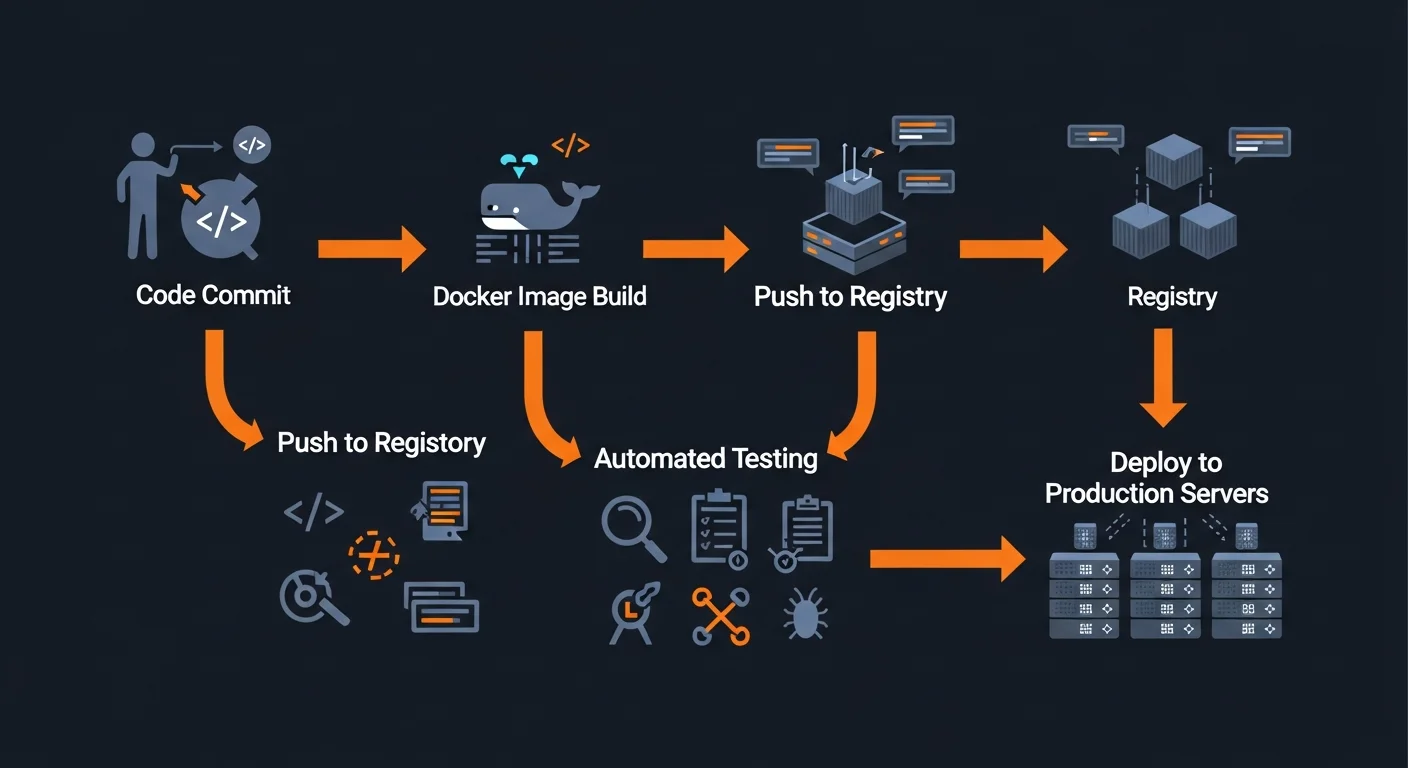
Docker is the backbone of modern CI/CD pipelines. By building immutable images in CI, you guarantee that exactly what was tested is what gets deployed.
GitHub Actions Example
name: Build and Push Docker Image
on:
  push:
    branches: [main]

jobs:
  build:
    runs-on: ubuntu-latest
    steps:
      - uses: actions/checkout@v4

      - name: Login to Docker Hub
        uses: docker/login-action@v3
        with:
          username: ${{ secrets.DOCKER_USERNAME }}
          password: ${{ secrets.DOCKER_PASSWORD }}

      - name: Build and push
        uses: docker/build-push-action@v5
        with:
          push: true
          tags: user/app:${{ github.sha }},user/app:latest
          cache-from: type=gha
          cache-to: type=gha,mode=max
Build Caching Strategies
- Layer caching: Order Dockerfile from least to most frequently changed instructions
- BuildKit cache mounts:
RUN --mount=type=cache,target=/root/.npm npm ci(60s to 5s!) - Registry cache:
--cache-frompulls previous build layers from registry - GitHub Actions:
cache-from: type=ghafor automatic CI cache management
Production Best Practices
Production Deployment Checklist
- Pin specific image versions (never use
:latest) - Run containers as non-root user (
USERinstruction) - Configure health checks for all services
- Set memory and CPU resource limits
- Enable log rotation (
max-size,max-file) - Use read-only filesystem with tmpfs where needed
- Set restart policy (
unless-stoppedoron-failure) - Use multi-stage builds for minimal images
- Include
.dockerignoreto exclude unnecessary files - Scan images for vulnerabilities before deploying
- Use Docker secrets or external vault for sensitive data
- Create custom networks for service isolation
System Cleanup
# Remove stopped containers
docker container prune

# Remove unused images
docker image prune -a

# Remove unused volumes (careful — deletes data!)
docker volume prune

# Remove EVERYTHING unused
docker system prune -a --volumes

# Check disk usage
docker system df
Deployment Strategies
| Strategy | How It Works | Downtime |
|---|---|---|
| Blue-Green | Two identical environments, switch traffic instantly | Zero |
| Rolling | Replace containers one at a time | Zero |
| Canary | Deploy to small percentage, monitor, then full rollout | Zero |
| Recreate | Stop all old, start all new (simplest) | Yes |
Quick Reference Cheat Sheet
Most-Used Commands
| Command | What It Does |
|---|---|
docker run -d -p 80:80 --name web nginx | Run container detached with port mapping |
docker ps -a | List all containers |
docker build -t app:1.0 . | Build image from Dockerfile |
docker exec -it web bash | Shell into running container |
docker logs -f web | Follow container logs |
docker stop web && docker rm web | Stop and remove container |
docker compose up -d | Start multi-container stack |
docker compose down -v | Stop stack and remove volumes |
docker system prune -a | Clean up all unused resources |
docker stats | Live resource monitoring |
Recommended Reading
Continue your Docker learning journey with these Dargslan eBooks:
- Docker Fundamentals — Complete guide to containerization
- Docker Compose & Multi-Container Applications — Production Compose patterns
- Docker Security & Production Hardening — Secure your containers
- Docker Networking & Storage Deep Dive — Advanced networking and volumes
- Docker for Web Developers — Docker for frontend and backend developers
- Kubernetes Fundamentals — Container orchestration at scale
Download the free Docker Fundamentals Cheat Sheet PDF — a 20-page reference guide covering everything in this article with commands, examples, and production best practices. Get your free copy here.


