Why SSH Tunneling Is the Most Underrated Skill in System Administration
Every system administrator knows SSH for remote login. You type ssh user@server, enter your password or use a key, and you are in. But SSH is capable of far more than just remote shell access. SSH tunneling — also known as SSH port forwarding — is one of the most powerful and versatile tools in a sysadmin arsenal, yet surprisingly few administrators use it to its full potential.
SSH tunnels create encrypted connections between ports on different machines, allowing you to securely access services that would otherwise be unreachable, bypass restrictive firewalls, and protect traffic on untrusted networks. In this comprehensive guide, we will cover every type of SSH tunnel, with real-world scenarios and production-ready configurations.
Key Insight: SSH tunneling does not require any additional software installation. If you have SSH access to a server, you already have everything you need to create encrypted tunnels. No VPN client, no special firewall rules, no additional ports to open.
Understanding SSH Tunnel Types
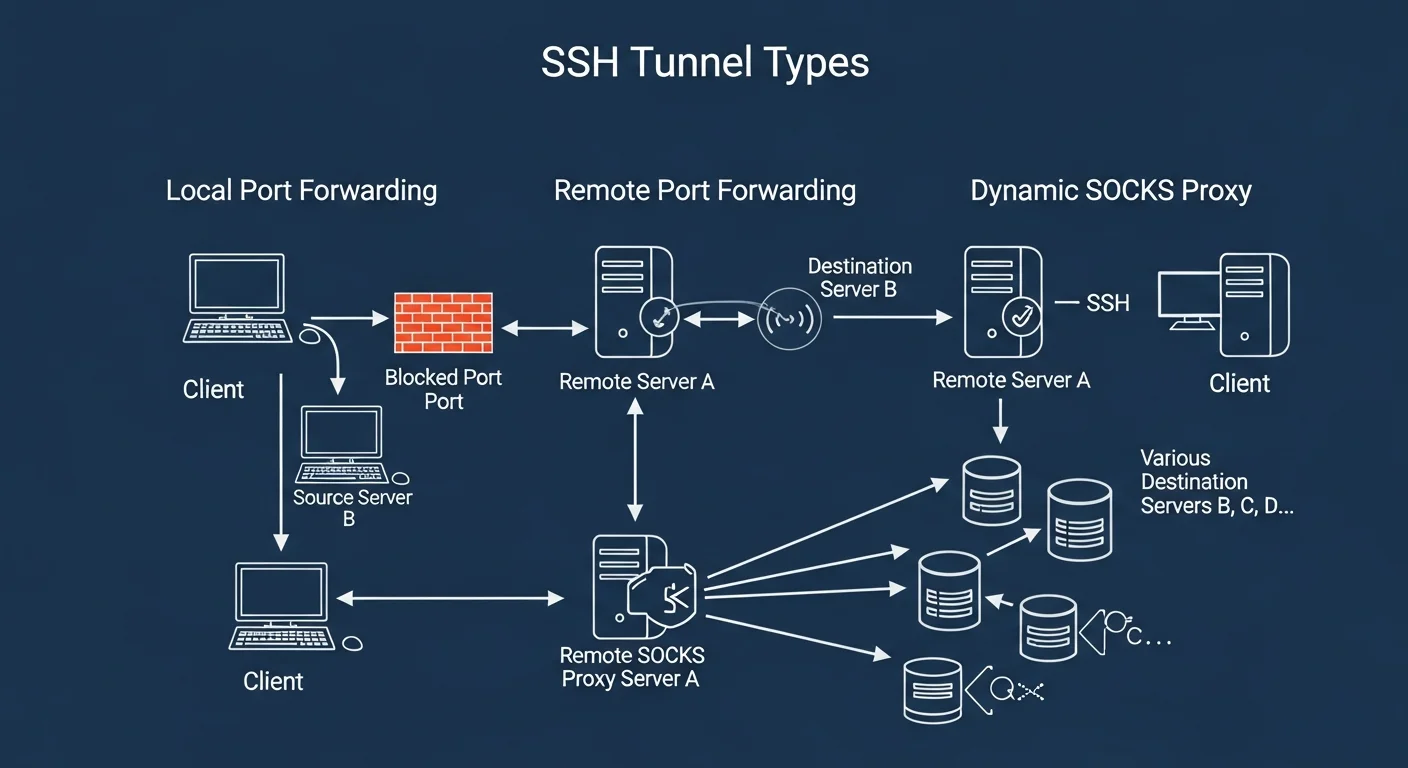
There are three fundamental types of SSH tunnels, each solving a different networking problem. Understanding when to use each type is critical.
1. Local Port Forwarding (-L)
Local port forwarding forwards a port on your local machine to a port on a remote machine through the SSH connection. This is the most common type of tunnel.
Syntax:
ssh -L [local_bind_address:]local_port:destination_host:destination_port user@ssh_serverReal-World Example — Accessing a Remote Database:
Your PostgreSQL database runs on a production server that only accepts connections from localhost (port 5432 is not exposed to the internet). You need to connect to it from your workstation using pgAdmin or DBeaver.
# Forward local port 5433 to the remote PostgreSQL on port 5432
ssh -L 5433:localhost:5432 admin@db-server.example.com

# Now connect your database client to localhost:5433
# It will be tunneled securely to db-server.example.com:5432
psql -h localhost -p 5433 -U postgres -d myapp
The traffic flow is: Your Machine (port 5433) → SSH Tunnel (encrypted) → db-server (port 5432)
Accessing a Service on a Private Network:
# The internal dashboard runs on 192.168.1.50:8080, only accessible from the jump host
ssh -L 8080:192.168.1.50:8080 admin@jumphost.example.com

# Now open http://localhost:8080 in your browser
# You are seeing the internal dashboard through the encrypted tunnel
Source: OpenBSD SSH Manual — ssh(1)
2. Remote Port Forwarding (-R)
Remote port forwarding is the reverse — it forwards a port on the remote server to a port on your local machine. This is incredibly useful when you need to expose a local service to a remote network.
Syntax:
ssh -R [remote_bind_address:]remote_port:destination_host:destination_port user@ssh_serverReal-World Example — Exposing a Local Development Server:
# Your local dev server runs on port 3000
# Make it accessible on the remote server at port 8080
ssh -R 8080:localhost:3000 admin@public-server.example.com

# Anyone who visits public-server.example.com:8080
# will see your local development server
Webhook Development — Receiving Webhooks Locally:
# You need to test Stripe webhooks but your dev machine is behind NAT
# Forward remote port 9000 to your local webhook handler on port 4242
ssh -R 9000:localhost:4242 admin@webhook-relay.example.com

# Configure Stripe to send webhooks to:
# https://webhook-relay.example.com:9000/webhook
Security Note: By default, remote port forwarding only binds to the loopback interface (127.0.0.1) on the remote server. To bind to all interfaces (0.0.0.0), you must setGatewayPorts yesin the remote server'ssshd_config. Be cautious with this setting in production.
3. Dynamic Port Forwarding (-D) — SOCKS Proxy
Dynamic port forwarding creates a SOCKS proxy on your local machine. Instead of forwarding a specific port to a specific destination, it forwards ALL traffic from applications configured to use the proxy through the SSH tunnel. This essentially turns your SSH server into a VPN-like proxy.
# Create a SOCKS5 proxy on local port 1080
ssh -D 1080 admin@remote-server.example.com

# Configure your browser to use SOCKS5 proxy at localhost:1080
# All browser traffic is now encrypted through the SSH tunnel
Using with curl:
# Route curl through the SOCKS proxy
curl --socks5-hostname localhost:1080 https://api.example.com/data

# Check your apparent IP address through the tunnel
curl --socks5-hostname localhost:1080 https://ifconfig.me
Source: OpenSSH Official Documentation
Advanced SSH Tunnel Techniques
Jump Hosts (ProxyJump)
In many production environments, you cannot directly SSH to application servers. You must go through a bastion host (jump host). Modern OpenSSH makes this elegant with the -J flag:
# Old way (nested SSH)
ssh -t bastion.example.com ssh internal-server

# Modern way (ProxyJump)
ssh -J bastion.example.com internal-server

# Multiple jump hosts
ssh -J bastion1.example.com,bastion2.example.com target-server

# With port forwarding through a jump host
ssh -J bastion.example.com -L 5432:localhost:5432 db-server
SSH Config File for Persistent Tunnel Definitions
Instead of typing long SSH commands every time, define your tunnels in ~/.ssh/config:
# ~/.ssh/config

# Jump host definition
Host bastion
    HostName bastion.example.com
    User admin
    IdentityFile ~/.ssh/id_ed25519

# Database tunnel through bastion
Host db-tunnel
    HostName db-internal.example.com
    User dbadmin
    ProxyJump bastion
    LocalForward 5433 localhost:5432
    LocalForward 6380 redis-internal:6379
    ServerAliveInterval 60
    ServerAliveCountMax 3

# SOCKS proxy through remote server
Host socks-proxy
    HostName proxy.example.com
    User admin
    DynamicForward 1080
    Compression yes
Now you simply type ssh db-tunnel and both the PostgreSQL and Redis tunnels are established automatically.
Source: OpenBSD ssh_config(5) Manual
Persistent Tunnels with autossh
SSH tunnels can drop due to network instability. The autossh utility automatically restarts tunnels when they fail:
# Install autossh
sudo apt install autossh   # Debian/Ubuntu
sudo dnf install autossh   # RHEL/AlmaLinux

# Create a persistent tunnel that auto-reconnects
autossh -M 0 -f -N -L 5433:localhost:5432 admin@db-server.example.com     -o "ServerAliveInterval 30"     -o "ServerAliveCountMax 3"     -o "ExitOnForwardFailure yes"
Creating a systemd Service for Tunnels
# /etc/systemd/system/ssh-tunnel-database.service
[Unit]
Description=SSH Tunnel to Production Database
After=network-online.target
Wants=network-online.target

[Service]
Type=simple
User=tunnel-user
ExecStart=/usr/bin/ssh -N -L 5433:localhost:5432 admin@db-server.example.com     -o "ServerAliveInterval 30"     -o "ServerAliveCountMax 3"     -o "ExitOnForwardFailure yes"     -o "StrictHostKeyChecking accept-new"
Restart=always
RestartSec=10

[Install]
WantedBy=multi-user.target
# Enable and start the tunnel service
sudo systemctl daemon-reload
sudo systemctl enable ssh-tunnel-database
sudo systemctl start ssh-tunnel-database
sudo systemctl status ssh-tunnel-databaseSSH Tunnel Security Best Practices
| Practice | Why It Matters | How to Implement |
|---|---|---|
| Use key-based authentication | Passwords can be brute-forced | ssh-keygen -t ed25519 |
| Disable root login | Reduces attack surface | PermitRootLogin no in sshd_config |
| Restrict tunnel permissions | Prevent unauthorized forwarding | AllowTcpForwarding local in sshd_config |
| Use non-standard SSH port | Reduces automated scanning | Port 2222 in sshd_config |
| Enable fail2ban | Blocks brute force attempts | sudo apt install fail2ban |
| Limit forwarding destinations | Prevent tunnel abuse | PermitOpen host:port in sshd_config |
| Use SSH certificates | Scalable key management | OpenSSH Certificate Authority |
| Monitor tunnel usage | Detect unauthorized tunnels | Audit logs + ss -tlnp |
Source: SSH Academy — SSH Tunneling Explained
Common SSH Tunnel Use Cases in Production
1. Secure Database Administration
Access PostgreSQL, MySQL, MongoDB, or Redis instances that are not exposed to the public internet. This is the most common use case for SSH tunnels in production.
2. Accessing Internal Web Applications
View internal dashboards (Grafana, Kibana, Jenkins, GitLab) without exposing them publicly. Forward the web port locally and access through your browser.
3. Secure File Transfers
While SCP and SFTP use SSH directly, tunnels allow you to use any file transfer protocol securely by routing it through an encrypted SSH connection.
4. Bypassing Restrictive Firewalls
When you are on a network that blocks certain ports or protocols, a SOCKS proxy through SSH on port 443 can route all your traffic through the tunnel.
5. Multi-Cloud Connectivity
Connect services across AWS, GCP, and Azure without setting up complex VPN configurations. SSH tunnels can bridge cloud networks quickly for development and testing.
Troubleshooting SSH Tunnels
# Check if your tunnel is listening
ss -tlnp | grep 5433

# Verbose SSH output for debugging
ssh -v -L 5433:localhost:5432 admin@server.example.com

# Very verbose (shows packet-level details)
ssh -vvv -L 5433:localhost:5432 admin@server.example.com

# Check if the remote port is accessible through the tunnel
nc -zv localhost 5433

# List all active SSH connections and tunnels
ps aux | grep ssh
SSH Tunneling Quick Reference
| Tunnel Type | Flag | Direction | Best For |
|---|---|---|---|
| Local Forward | -L | Local → Remote | Accessing remote services locally |
| Remote Forward | -R | Remote → Local | Exposing local services remotely |
| Dynamic (SOCKS) | -D | All traffic through proxy | Browsing, multi-service access |
| Jump Host | -J | Through bastion | Accessing isolated networks |